If you know where to look and what to look for, it’s possible to make hundreds of dollars a day buying things from websites just to sell them on a different website.
The process is called online arbitrage. Some people call it Amazon arbitrage or Amazon online arbitrage, but the process can work on other marketplaces too.
The most reliable sources of products are from the websites of large retailers that you are likely already making purchases from like Walmart, Home Depot, and Target. We’ll talk about more sites for online arbitrage in a minute.
Two strategies I consider critical to earning a consistent profit with online arbitrage in 2021…
Buying online and then reselling online – sounds a bit odd, doesn’t it?
I was a bit skeptical about this right away, but over the years it’s been a great way for my business to source inventory. It makes it possible to source inventory from anywhere you have an internet connection. With that being said, it isn’t as simple as just going to websites and buying stuff. While we’ll talk about all the strategies we use, here are 2 key strategies that I consider necessary to having success with OA in 2021.
Key 1: Use a good product evaluation tool.
While you can do online arbitrage “manually” by just heading to websites and browsing their catalog for sales or clearance items and comparing the prices to what the item is selling for on Amazon, we recommend using tools for bulk product evaluation.
This allows you to process an entire websites inventory automatically, then you just go back through doing a manual review of products that match the criteria you set in the tool. Instead of looking at every product, you only spend your time on the ones that have the best chance of being profitable.
I’ll go over the main tools we use when performing online arbitrage later in this guide.
Key 2: Leverage gift cards, cash back sites, and coupons.
Online arbitrage allows the ability to use coupons, cashback sites, discounted gift cards, and other strategies that unlock significant discounts compared to retail.
Many people don’t realize that this is possible, and it can make many products that otherwise would be borderline a very attractive opportunity.
If you aren’t using these strategies, there is a good chance you will be wasting a lot of time by passing up on opportunities. I’ll cover all of these later in this guide.
[cp_popup display=”inline” style_id=”8890″ step_id = “1”][/cp_popup]
How Does Online Arbitrage Earn You a Profit?
Online Arbitrage makes you money when you buy items at a significantly lower price compared to what you will sell them for on a different marketplace. But don’t forget — you need to account for marketplace fees and shipping costs.
For example, let’s say you can buy an item for $19 from Walmart’s website, and it’s selling for $44.99 on Amazon. After all of the fees and shipping costs, Amazon will pay you $34 after a customer buys your item. In this example, you would make a profit of $15 on your initial $19 investment.
Essentially, this is how online arbitrage can earn you money on Amazon. Below, you’ll learn more about how to get started with online arbitrage. Most importantly, you’ll learn how to source products and be profitable.
How to Get Started with Online Arbitrage Sourcing
The first step in getting started with online arbitrage is setting up an Amazon seller account. This is the account you’ll need to sell items on the platform.
When you are signing up for your account, I recommend using an “individual” seller account.
This account type has no monthly fees and is perfect for new sellers on Amazon. You can sign up here. Be sure to scroll part way down the page and click the link about becoming an “individual seller” as shown in this screenshot:
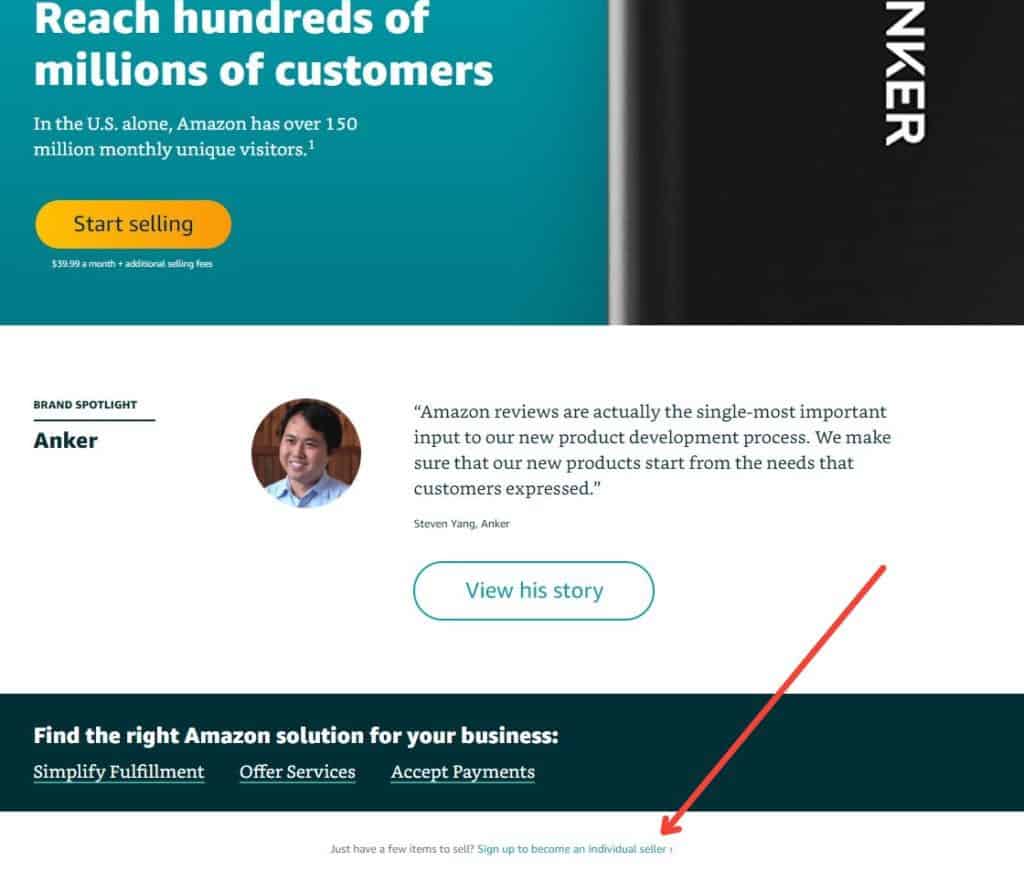
Note: this screen changes from time to time. If you don’t immediately see a link to sign up as an individual seller, hold the control key on your keyboard, then press “F” on that page on Amazon’s website. Then type “individual” and it should take you right to the link to sign up as an individual seller, which does not have any monthly fees.
Next, you will be required to fill out some forms to get your account setup. It should take less than 10 minutes to complete the application. For most people, you will be approved right away, but it’s possible Amazon will have to review your application. Once your account is approved you will be able to get started selling on Amazon.
Your new seller account will provide you details on your eligibility to sell a variety of different products, and will be an important part of deciding what to buy, which we’ll cover later in this post.
What Tools Do I Need for Online Arbitrage?
The only things that you must have to do online arbitrage are an Amazon seller account, a computer, access to the internet, and some money to spend on inventory. There are a lot of other tools and things that are helpful, but to get started you don’t need much.
With many business opportunities, you need a huge amount of upfront capital, but online arbitrage is not one of them. Ideally, I recommend starting with at least $200, but you can get started with whatever you have available. You just need to be able to buy a few items to sell to get started.
Most of these are not required to get started but will make the process easier, and I’d recommend considering them as soon as you have the money. We’ll discuss how to actually use the tools later in this guide.
FBA Revenue Calculator – This one is required if you aren’t using one of the other tools on the list. It’s free and provided directly by Amazon. This tool will show you exactly how much you will get paid when you sell an item and allows you the ability to calculate your potential profits on any item you purchase.
A 2nd monitor – A 2nd monitor will make your life much easier when doing online arbitrage. It will allow you to have items you are considering purchasing open on one tab, and the Amazon listing for the item open on the other page. This allows you to more easily compare the products, make sure the items match and look for special offers.
InventoryLab – InventoryLab is a suite of software tools that help you sell on Amazon. One of these tools is an online “Scout” tool. It will allow you to search for items and then show you just about all of the information you need to make a purchasing decision on one screen. After we walk through the steps required, you’ll see why this is worth considering. I’ll show you a screenshot later in this post.
Revseller – This is a Google Chrome extension that will show you some very helpful information about any product you are looking at on Amazon. It displays the information directly on the page when you are looking at items on Amazon. For categories with a lot of variations, it’s especially helpful.
Tactical Arbitrage – Tactical Arbitrage is a tool that automates a large portion of the online arbitrage process. The tool allows you to pick a store, set the financial criteria for the products you are looking to purchase, and then the software will go to work analyzing all the available products for you. You can set the tool to run your search, and then within a few minutes you will be able to start looking through the products that fit the criteria you set. This is a tool that I use in my business, and it will do the majority of the steps outlined in this post automatically. I’ll include some screenshots later in the post so you can see how it works.
Cash Back Sites, Giftcards & Coupons for Online Arbitrage
Before we get into searching for items to sell via online arbitrage, we need to talk about how to get the best possible price on the items that you are purchasing. Every discount that you can get will lower your cost of inventory, and as a result, will make it so you can find more profitable items to sell.
There are 3 things that factor into getting the best possible price. These 3 are cash back sites, discounted gift cards, and coupons. These 3 things on top of sale prices can lead to some very good deals that will have you buying for very low prices.
Cash Back Sites
First, we’ll talk about cash back sites. These are websites that will pay you a percentage of the amount you spend at participating retailers. All you have to do is start your shopping trip via the link on the cash back site.
Let’s say for example you are going to buy an item at Walmart.com, and the cash back site is offering 8% cash back. If you start your shopping trip at that cash back site via their link, you will then earn 4% cash back on the total amount you spend at Walmart. If you spend $250, you’ll earn $20 in cash back. Using a cash back site won’t cost you anything extra, so it is purely a bonus. These rewards add up very quickly over time.
My favorite cash back site is Ebates, and they have been very reliable at tracking and paying cash back. You can also use tools like Cashbackmonitor or Cashbackholic to compare the cash back percentages that different sites are offering. I use those as well, but anytime Ebates is close to the best cash back offer, I will use them as from experience I know that I will actually get paid the stated cash back that is offered.

Discounted Gift Cards
Next up are discounted gift cards. If you aren’t familiar with discounted gift cards, these are gift cards that are sold for less than face value. For example, a $100 gift card to Target might be available for purchase for $93.
This is just one example, and discounts will range from 1% up to about 30% off depending on the demand for the retailer you are looking for discounted gift cards too.
With discounted gift cards, you want to be sure that you are buying from reputable websites and sellers. You are literally buying cash equivalents, so it’s quite important that you know that you are buying legit gift cards, and that you’ll have a guarantee in the event things don’t go right.
There are quite a few discounted gift card sites out there. You can compare the different offers that are available through a site called Gift Card Granny. This website will allow you to search for a retailer, and then you will be able to see the level of discount that is offered by different sellers.
My favorite site to buy discounted gift cards from is Raise. Any time they are close to offering the best price I go with them as they’ve been very reliable every time that my business has used them.
Coupons
The 3rd main way that you can get a better deal on the items you are purchasing is through coupons. Coupons are one of the biggest opportunities to get the best deals. The amount of discounts you will be able to find will vary widely by retailer, but spending time finding the best possible coupon is generally time well spent.
One of the best ways to find coupons is to sign up for each store’s email lists. I recommend setting up a separate discount specifically for this purpose so it doesn’t overtake your main inbox. You’ll often get the biggest deal on your first purchase after signing up, so make sure you take advantage of that offer.
A couple other free tools that I like for finding coupons are both Google Chrome Extensions.
The first is Price Blink. It will show you coupons and discounts available on the website you are on, and will also let you know if the item you are looking at is available for a lower price from another retailer.
The second is called Honey. It will automatically apply the best coupon they can find to your cart to make sure you are getting the biggest discount possible.
These extensions should help you find some deals on the majority of stores you will be shopping at. If these extensions aren’t coming up with good coupons, then searching on RetailMeNot, or simply searching “Retailer Name + Coupon” in Google are my next options.
These are the 3 main things that I look to do to get the lowest price when doing online arbitrage. These 3 are the main ways I’m lowering the amount that I will be paying for inventory.
A couple other things to do when possible are signing up for any available store reward program, and using a rewards credit card. These will provide some additional nice bonuses when they are available.
Using the methods outlined in this section will help make sure you are buying items for very good prices, and help maximize your profits for any items you are going to sell.
How to Find Items to Buy for Online Arbitrage on Amazon
Now it’s time to talk about how to find items to sell on Amazon.
The first step is to find an online retailer that you would like to evaluate items from to potentially sell on Amazon.
Depending on what information the site provides will be the determining factor in looking up the potential to sell the item on Amazon. When possible it’s preferred to have the UPC of the item to be able to look the item up. This is the easiest, and generally most accurate way to find items. For example, here’s a look at the product details section of a website that has UPCs displayed on the site:
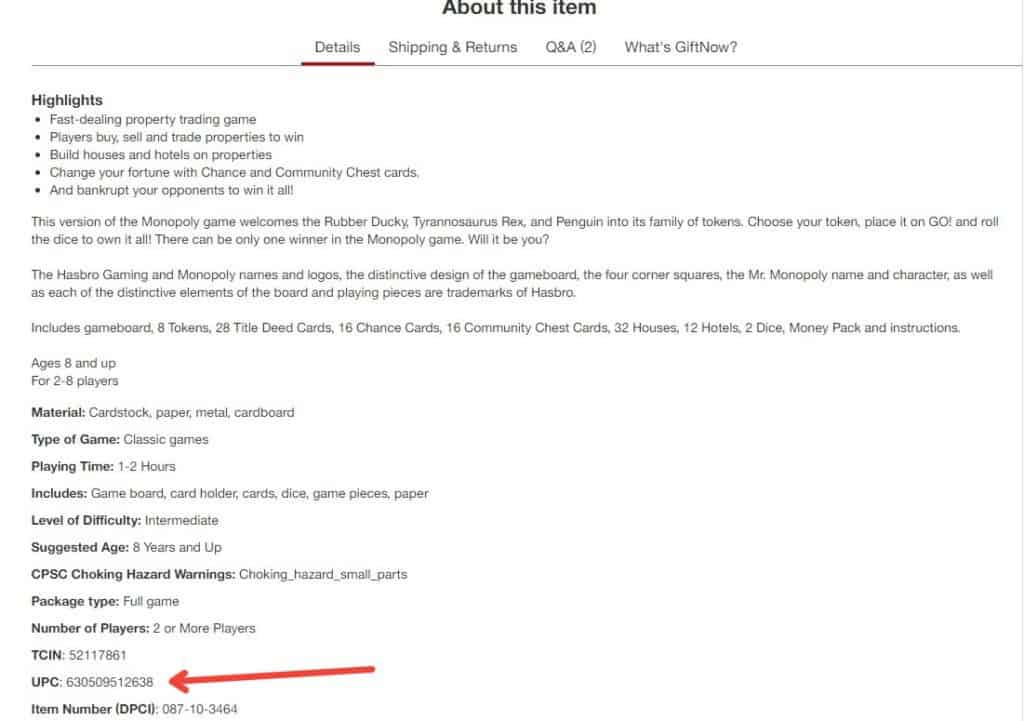
What you want to do is copy the UPC from the website, and then paste that UPC into Amazon or the evaluation tool that you are using to find the corresponding listing on Amazon. With UPCs, the items generally will match, but it’s still important to verify that the item on the website you are buying from matches the product listing on Amazon.
If there is not a UPC on the website, then you can try searching the title of the item on Amazon. You will copy the title of the item, and then paste it into Amazon or your evaluation tool, and find the corresponding listing on Amazon. Using this method you have to be very careful that the products are an exact match between the website you are buying from, and Amazon.
Here’s a gif of the process:
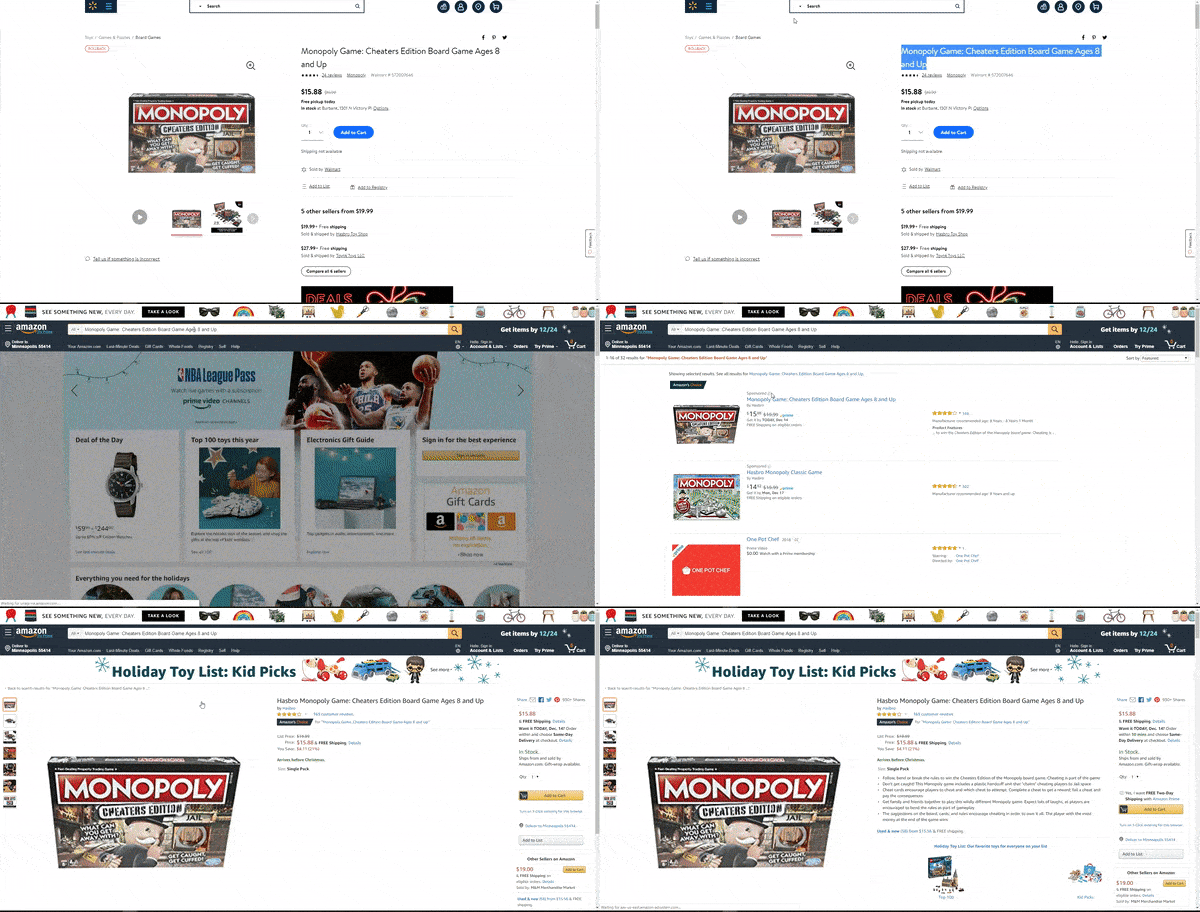
A quick tip for using this method is to use “ctrl + C” to copy, and “ctrl + V” to paste. This will make things dramatically more efficient than having to right click for both copying and pasting. So press and hold the control key, and then either C or V depending on if you want to copy or paste.
One additional way you can try searching for the matching item is to use a “reverse image search.” This is a feature in Google that allows you to see if the same image is located anywhere else online. In our case, we want to see if the same exact image is used on Amazon. To do a reverse image search, you will right click on an image of the product on the site you are searching on, and then select reverse image search.
Here’s a gif:
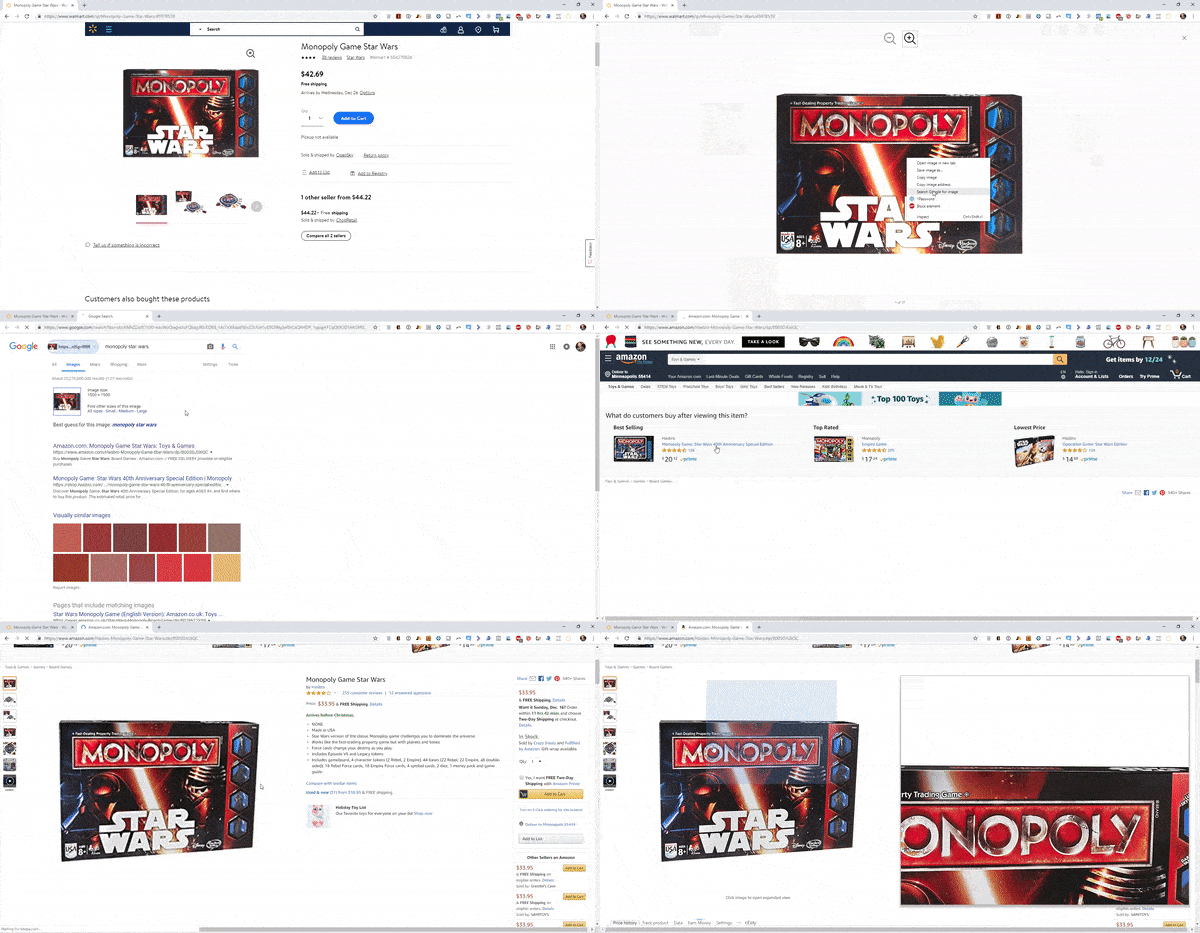
Then you will scroll through the list of results to see if there are any that are directly from Amazon. If there are, click on the listing, and evaluate if the product is an exact match to the Amazon listing.
The above methods are relatively manual processes. The other option for finding products via online arbitrage is using a tool like Tactical Arbitrage. I’ll stick with the more manual (and free) methods for most of this post, and will discuss Tactical Arbitrage a bit more in the advanced tips section of this post.
Now that we have found a product on the website we are doing online arbitrage on, and found the matching listing, it’s time to evaluate if it’s an item we actually want to sell on Amazon.
How to Determine Which Items to Buy Via Online Arbitrage to Sell on Amazon
There are 3 main factors that you will want to evaluate for any item you are considering selling on Amazon. The 3 factors are: your eligibility to sell the item on Amazon, how long it will take to sell the item, and how much profit you will make from selling the item.
You can do these 3 things in any order, but you will definitely want to complete all 3 steps before buying any item via online arbitrage.
How to Determine if An Item Will Be Profitable for Online Arbitrage on Amazon?
The ultimate goal of online arbitrage is for you to make a profit, so we’ll talk about evaluating profitability first.
In this step, we’ll be comparing the amount we can buy an item for from an online retailer versus what we’ll get paid for an item if we sell it on Amazon. To do this comparison, we need to know how much we are paying for an item, and how much we’ll get paid for it when it sells.
Determining how much we are paying is quite easy. It will be the price listed on the website you are buying from, less any discounts you are getting using any of the methods outlined above in this post. Let’s say an item is listed for $10 on that website, and you have a coupon for 20% off, and there’s 5% cash back available. This means we’ll be spending $8 on the item, and we will receive $0.40 in cash back. This means the net amount we will be paying is $7.60.
Now we need to figure out how much we’ll get paid if we sell that item on Amazon. The free way to check this is to use the FBA Revenue Calculator. This tool will allow you to search for any product that is for sale on Amazon and see how much fees you will pay. More importantly, this allows you to determine how much you will get paid for the item when it sells. You can access the FBA Revenue calculator HERE.
You can see an example of it here:
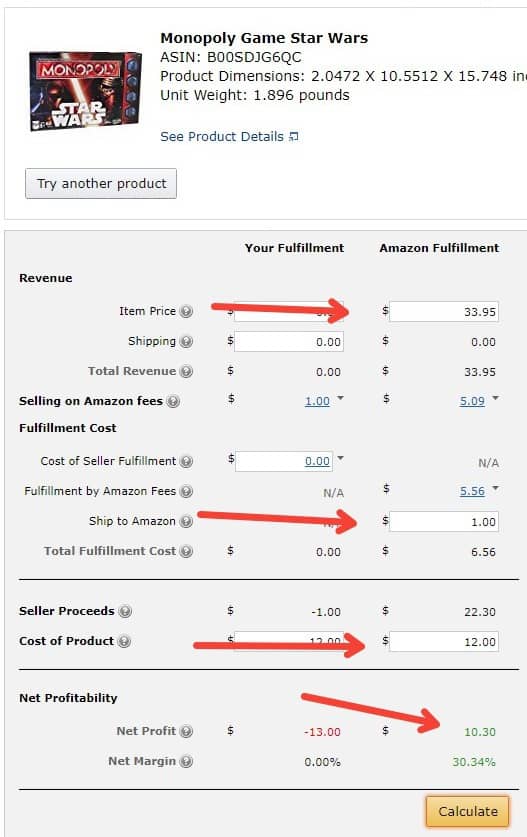
This tool will allow you to enter the selling price, your cost to ship the item to Amazon warehouses, and the cost to purchase the product. I recommend setting the selling price at the current price the item is selling for on Amazon.
Set the cost to ship to Amazon at $0.50 per pound as a starting point. That’s the rate we use in my business, but over time you should calculate the rate you are paying in your business, and then use that going forward.
Then enter the cost you are able to purchase the item for. After you’ve entered in all of this information in the “Amazon Fulfillment” column, you will be shown a profit number. This is how much you will make if you sell the item for the price you input. I recommend making sure you are going to make at least $3 in profit on any item you are considering selling.
You can see all of this in the example above.
The next step is to evaluate your return on investment (ROI) for the product. You can calculate this by taking the profit number from the step above, dividing that by your cost to purchase, then multiply by 100. The result will be your ROI in percentage form. When getting started, I recommend only buying items that have a 50% ROI or greater.
For the example above, the formula is ($10.30 / $12) x 100 = 85.83% and in this case this would be an ROI that you want to purchase.
If the profit is greater than $3 and the ROI is over 50%, move on to the next step in your evaluation. If the profit or ROI does not meet those thresholds, you can skip doing the other pieces of evaluation, and move on to the next item.
This might seem like a lot of steps, so I will be sharing a couple of tools in a moment can make this process easier. What I’ve outline above works, it’s free, and it’s exactly what I started with. So it is definitely good enough to get the job done, but there are more efficient ways.
How to Determine if there is proper demand for an item purchased via Online Arbitrage?
Another very important piece of information to evaluate on any item you are considering selling is evaluating the demand for that item.
The easiest way to gauge this is by taking a look at the sales rank. The sales rank is a number that is specific to the Amazon platform that is an indication of how long it has been since an item last sold in relation to other items in it’s category. The lower the number the more recently the item has sold.
Items with a low number as the sales rank in general will continue to sell well. As with many things, past performance does not guarantee future results, so there is at least some risk that the item won’t sell as fast as you think it will. You can get a better gauge of demand by looking at price history charts and looking at reviews, but that’s a bit beyond the scope of this post.
Starting with sales rank will get you started on the right track, and help make the process more efficient. I recommend looking for items that have a sales rank of less than 250,000 when you are getting started. Over time you will definitely want to adjust this as you gain experience, but sticking to sales ranks with a number less than 250,000 is a good way to mitigate risk in the beginning.
If the item you are evaluating has a sales rank less than 250,000, then it’s time to move to the next step in the evaluation.
How to Determine if you are eligible to sell an item on Amazon?
Especially as a new seller I recommend that you check to make sure you are eligible to sell the item you are looking at on Amazon. Certain categories such as clothing, shoes, grocery, and beauty are typically unavailable without approval. While categories like toys, books, home improvement, home, and electronics are available to brand new sellers.
You will also be restricted on certain brand names. Some examples that you are likely to be restricted on right away include Nike, Bose, and Lego. There will be others, but some big name brands, and brands that have a higher than normal risk of counterfeiting, you will not be eligible to sell.
There will still be many more items that you are able to sell, and I recommend that you focus on them when getting started. To make sure you are eligible to sell an item, you will need to login to your Amazon Seller Account. Then hover over the inventory tab, then click “add a product.” Then you will be brought to this screen:
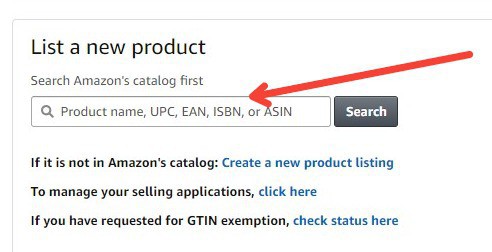
Enter in a search term in the above box. Then click search. In this example, I’m searching for “Bose”:
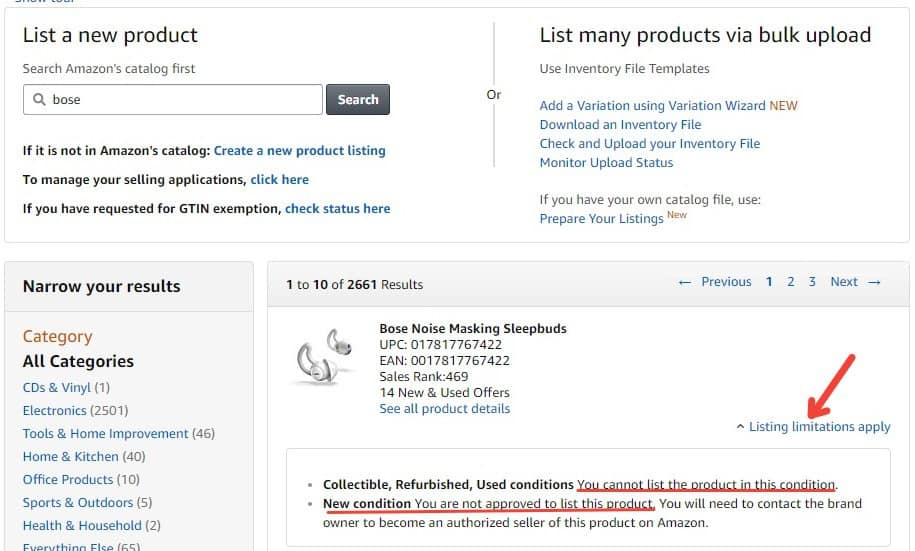
You can see that it says “listing limitations apply” and that I am not eligible to sell this particular product in any condition. In this case I would not purchase this product to sell on Amazon, as I’m not eligible to sell it.
If you are eligible to sell the product, it will look like this:
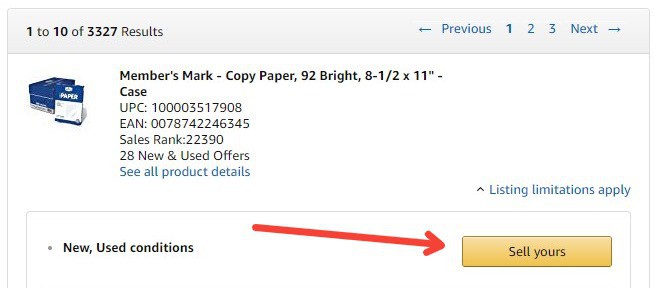
In this example you can see that there is the yellow “sell yours” button. This means that you are eligible to sell this item on Amazon.
On the items you are not eligible to sell, you have 3 main options:
- Do not buy the item.
- Go through the approval process so you can buy the item.
- Buy the item to sell somewhere besides Amazon.
In order to be efficient when first getting started, I typically recommend option #1 or #3. As you gain more experience and know that selling online is something you want to take seriously, then it’s worth going through the approval process (option #2) on a good portion of the items you come across that you aren’t eligible to sell.
The profit is good, there is demand, and I’m eligible to sell. Now what?
After you’ve gone through and verified that the item you are considering meets all of the criteria, then you will want to purchase that item to sell on Amazon. When you are getting started I recommend buying no more than 6 of each item that you find. This will make it so that you keep your inventory diversified and don’t have too much risk in any one item.
So my recommendation is to add the number you wish to purchase to your cart, and then move on to evaluating the next item. The more items you evaluate, the more profitable items you will find!
The steps above can be evaluated in any order. I recommend testing out checking the numbers, demand, and your eligibility to sell in different orders, and see which way is the most efficient for you. Then stick with that method.
Also, be sure to use the coupons and cash back sites prior to checking out. After you checkout and your items arrive, it’s time to get the inventory listed for sale! We’ll walk through how to do that after a quick discussion fo ways you can make this process more efficient.
Using Tools to Make Online Arbitrage More Efficient
Evaluating Items Using the InventoryLab Scout Tool
One of the tools we use in my business is the InventoryLab Scout tool. It will show you many of the pieces of information you need for making a decision if you want to sell a product, all in one screen. Here’s an example:
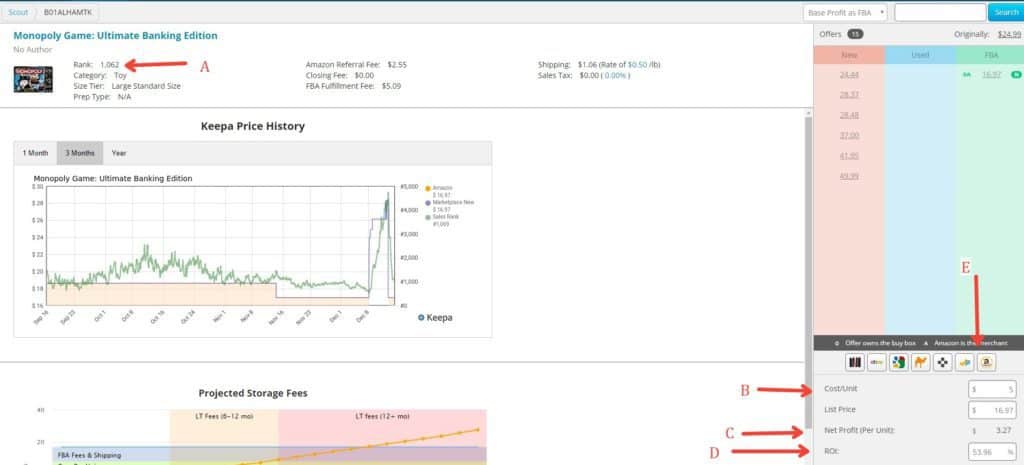
A few things to point out specifically that it will show you in one screen:
- The sales rank of the item in the top left (A in the screenshot).
- The ability to enter in your cost (B) and immediately calculate both your net profit (C) and ROI (D).
- Hot links to do additional research (E). One in particular that is extremely useful is a hot link that will allow you to check your eligibility to sell the product.
There are many other useful features as well, but these are some of the main ones that help with online arbitrage. If you are interested in testing this out, you can sign up for a free trial of InventoryLab.
Evaluating Items Using Revseller
Another tool that can speed up the evaluation process is a Google Chrome Extension called Revseller. This will overlay some additional information on any product you are looking at on Amazon. Here’s an example of what it looks like on an Amazon page:
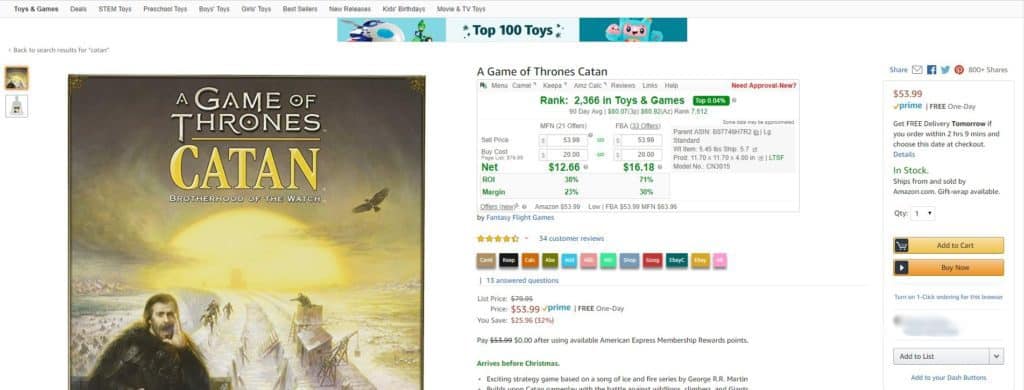
As you can see the box in the center of the screen pops up to give you some additional info. Let’s take a closer look:
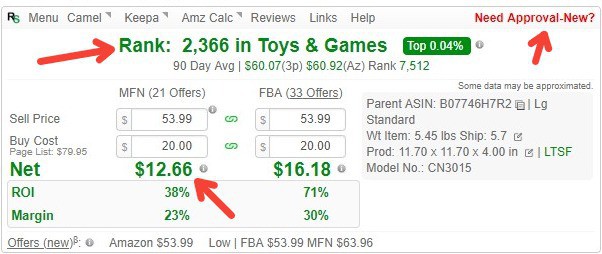
Essentially you will enter in your buy cost, and the rest of the information automatically populates. The extension shows you sales rank, ROI, and net profit all in one section. It also will show you if are eligible to sell an item or not in the top right hand corner. On this product you can see “Need Approval-New?” this means that I am not eligible to sell this product. This is a very nice feature as it doesn’t require any additional steps to see if I am approved to sell this item.
Those are a few of the main features, but it’s just the beginning of the list.
This is a tool that I’m using in my business and find very helpful to make evaluation more efficient. If you’re interested you can sign up for a free trial of Revseller.
Evaluating Items Using Tactical Arbitrage
If you really want to automate and are very serious about online arbitrage, then I strongly recommend looking into Tactical Arbitrage. This is a piece of software that will help evaluate products for you. Tactical Arbitrage has a selection of over 450 websites in the United States that you can search.
The way it works is you pick a website, a category in the website, and then the software will go to work finding products that meet the buying criteria that you set. Essentially this service will go through hundreds and hundreds of pages of results for you. The tool will go to work on the search you set right away, and then will start to find you items that match your criteria. The software is literally finding you profitable inventory opportunities. Depending on the size of the search it can take several hours for a search to complete, but you’ll start to see results of profitable inventory as soon as the software finds them.
Here’s a look at how to setup a search:
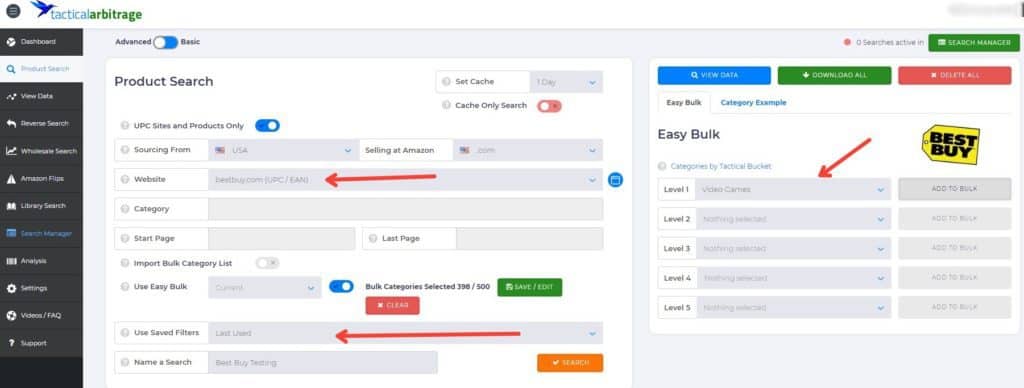
You pick a website from the list of over 400, pick a category you want to search, set your filters, and then you will be ready to set your search in motion. In the above example, I have the software looking for profitable products from Best Buy in the Video Games category. As soon as I click search, the software will go to work looking for profitable items.
Here’s a look at an output of results found by the software:
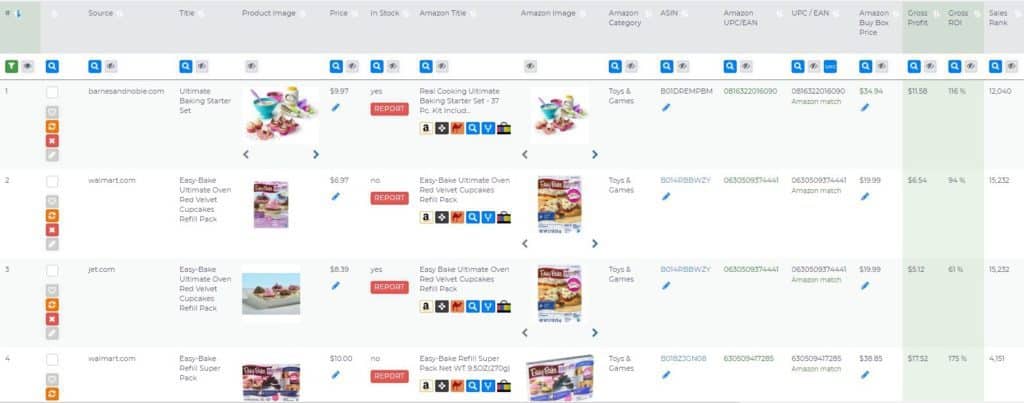
This was a search that I did in the toys category of Walmart’s website. All of the items in the results are profitable items that fit my buying criteria. You can see that the software will provide just about all of the information you need to make a sourcing decision. It will match up the offer on Walmart to the one on Amazon, and then pull in all of the relevant data from Amazon. In this case you can see the profit, ROI, and sales rank all in this screenshot.
One other feature I had on in this search had Tactical Arbitrage check other sites if they found a deal on Walmart. Essentially if there was another site in addition to Walmart that sold the product which was selling for a profit on Amazon, the software will let me know where else I can buy it. This is very useful if one store goes out of stock, or if you are looking to buy a significant quantity of an item.
That’s a very brief overview of just one of the search features. It really isn’t doing the software justice by only showing this, but this is the part that relates most directly to the online arbitrage strategies outlined in this post.
There are many other searches and features you can use that are beyond the scope of this post. If you are interested in testing it out you can sign up for a free trial of Tactical Arbitrage.
How to List Items for Sale and Send them to FBA Warehouses?
Now that you’ve purchased some items, after they are shipped to you, your next step is to list the items for sale on Amazon. In my business, we use the Fulfillment by Amazon program for just about every item that we sell on Amazon. Utilizing this program allows us to ship items to Amazon in bulk, and they handle shipping items to the individual customers.
I have a complete blog post to walk you through listing your items for sale and getting them shipped to FBA warehouses. If you’ve never been through this process before, you’ll want to read my comprehensive guide to Amazon FBA shipping.
21 of The Best Websites for Online Arbitrage for Amazon FBA
Online Arbitrage is something that you can do from just about any website. Here are a few ideas if you need them to get started:
- Walmart
- Sams Club
- Home Depot
- Target
- Lowes
- JCPenney
- Office Depot
- Kohls
- Kmart
- Sears
- Best Buy
- Big Lots
- Shopko
- Bloomingdales
- Dick’s Sporting Goods
- Sierra Trading Post
- CVS
- Walgreens
- Frys
- Gamestop
- Herbergers
I have purchased from the majority of the above list for online arbitrage in the past. This is just the beginning, and you should explore other sites beyond this. Some small niche-focused sites can provide some of the best deals.
Start with one of the ones on the list, and then branch out from there!
How Much Money Can You Make With Online Arbitrage for Amazon FBA?
The income potential of online arbitrage is very sizable. I know of several individuals who are doing around $1,000,000 in sales per year sourcing mainly via online arbitrage. It took them a significant amount of time to get to this level, and was slow going at the beginning, but getting to that level is possible.
Realistically if you are able to spend 10-15 hours per week on online arbitrage, have the ability to invest a couple thousand dollars in inventory, I think it’s reasonable to expect that you will be making over $1,000 in profit within a few months.
Even if you don’t have a couple thousand dollars to invest, you can get started with what you have, and compound results relatively quickly. You can do this by taking the money that you get paid by Amazon and continually reinvesting that capital in more inventory. Doing this over and over again will lead to very nice compounded returns.
The more time you put in, the more you can make, but hopefully this gives you an idea of what to expect in terms of the income potential of online arbitrage.
Expert Level Online Arbitrage Tips
Here are a few additional tips form my experience selling on Amazon:
- While this post focuses on selling the items on Amazon, I highly recommend considering selling items you are sourcing on other platforms as well. There might be items you are restricted on for selling on Amazon, but you could make a nice profit selling them on eBay. In my opinion you should make selling the items on Amazon your first choice, but don’t make it your only option. If you limit yourself to just Amazon, you will be leaving money on the table.
- Make sure you are restocking inventory when you sell out. Some items that you will come across will be normal price items that are always available. When you come across these items your goal should to be in stock 100% of the time. Keep track of your inventory and make sure you are ordering more of products that are selling well. Selling the same product multiple times is significantly easier than sourcing a new product every time.
- Use an advanced tool like Tactical Arbitrage. This will save you a significant amount of time, and will allow you to evaluate products much faster than by using the manual process.
- Consider having a virtual assistant help source products for you. This can help speed up the process even further, and is something that I do in my business. You can read more about my strategies about having virtual assistants help with online arbitrage in this post.
That’s a quite comprehensive post on online arbitrage, and I’ll close out the post shortly. If you have questions or comments, please share them below!
Learn More About Building an Online Retail Business…
If you are new to selling online, you should check out our Launch Accelerator. This is an intense, 4-week program where you’ll work directly with my team and I to get your first profitable products listed for sale online – with guaranteed results!
We’ll also be launching a similar program dedicated to online arbitrage soon. Check here for details.
And if you haven’t downloaded our guide on building a 7-figure business yet, you can grab a free copy now using the box below…
Free Guide: How to Build a 7-Figure e-Commerce Business from Scratch
Looking for ideas on how to scale your business and escape the 9-5? Check out this free guide on building a successful online retail business from the ground up.

Concised, direct and detailed. Thank you.
I have scoured the internet looking for a straightforward explanation and this nailed it! Thank you!
Excellent, glad to hear you found it helpful Nikki!
Best Regards,
Ryan
Really helpful, i am new selling online but this post definetly motivated me to start online arbitrage, thanks very much Ryan
Thank you very much for such a detailed explanation. i have recently started selling on amazon and was looking for a guide like this.
Hi Sam,
Great to hear it, best of luck as you are getting started!
Best Regards,
Ryan
So you have a course that focuses specifically on Online Arbitrage?
Hi CJ,
Thanks for the comment. At this time I do not have a course that focuses just on Online Arbitrage.
Best Regards,
Ryan
Hi Ryan,
Thank you so much, this information is extremely helpfu. I appreciate it.
Hi Shilette,
You are welcome, glad you found it helpful!
Best Regards,
Ryan
Hi Ryan,
Another great post, informative and easy to digest as usual, thanks.
From pricing perspective, what do advise to get “Scout”, “Revseller”, or “Tactical Arbitrage” ? Is it really worth the pricing difference?
Thanks.
Even
Hi Even,
Thanks for the comment. All 3 tools really do something different, so it’s not really fair to compare them from a pricing perspective. But if I had to pick only one tool for online arbitrage, I’d go with Tactical Arbitrage specifically for online arbitrage, as it is specifically designed to help you find profitable items to sell.
Best Regards,
Ryan
I really enjoy learning more and more about the online selling world. I have done some online arbitrage recently. Do you always have items shipped to you first and then ship to Amazon, or do you sometimes ship directly to Amazon to save on the shipping? There is so much to learn, but I am amazed at your depth of knowledge!
Hi Diane,
Thanks for the comment.
For me personally I always have the items shipped directly to me first. I want to be able to inspect the items to make sure they are in the proper condition and match the listing exactly.
There are ways to ship direct to Amazon from online suppliers though should you want to go that route in the future.
Best Regards,
Ryan
Hi Ryan! I have read many of your posts, so thank you! Very informative and easy to understand! One question that I just can’t find the answer to….someone is looking for…”Barbie Fairy Dress Up Doll” (for example), and they find it for $22.30, sold by Barbie itself…, can click “buy now”. Why would they look at that side bar with all those other “fullfillment by Amazon” sellers, and buy the same barbie there for the same price or even more?? I as a buyer wouldn’t even THINK of checking there, let alone actually buying from there. I’d buy from Amazon using the direct link in the main add, sold by Barbie!
Thanks for help!
Judy
Hi Judy,
Thanks for the comment, and the kind words!
When you say the “buy now” option in your comment, that is known as the “buy box.” Most sales do happen through the buy box, and a lot of customers won’t even look at the other options. The buy box rotates between sellers, and will feature different sellers at different times. It can change based on price, and shipping proximity, among other factors. The times when you are in the buy box are when you are most likely to get sales, and if you are priced competitively you will likely end up rotating through the buy box.
So that’s one part to your answer. Other customers will look at all of the sellers on a listing to see which one is the best for them. They may choose based on lowest price or fastest shipping. But not all customers do this, and most sales do happen through the buy box.
Hope this helps!
Best Regards,
Ryan
Great post as always.
Do you have a cadence for how often you try to hit each site? Are you utilizing multi-domain bulk searches? How are you handling perishable goods as the dates aren’t always shown?
Hey Matt,
Thanks for the comment.
On your question, I’ll normally aim to hit each site a couple of times per month, and more often if they email out some type of promo. We do use multi-domain bulk searches. I don’t do a ton of perishable goods via OA, but if we do I’ve found that most of the time the dates are OK. If they aren’t then I’ll contact the retailer I bought them from and see if a return is possible.
Best Regards,
Ryan
Ryan, fantastic post! Very detailed and informative for beginners as well as more experienced sellers. The screen shots were helpful. Thanks!
Thanks Jill, glad you enjoyed it!
Best Regards,
Ryan
Once again-thank you Ryan-I have not tried OA and wanted to aliviate the running around from store to store with RA. Also, the easy explanation of TA was a gift for me. You are a superstar!
Hi Sarah,
Thanks for the kind words, and glad you found the post helpful!
Best Regards,
Ryan