In order to get Amazon to return your inventory, you have to submit what is known as an FBA removal order. Submitting an FBA removal order can be done via seller central, and you have to pay a removal fee for each item.
In this guide, we’ll cover three different ways that you can submit a removal order depending on the amount of inventory you need to have returned and the fees for the return and disposal of FBA inventory.
[cp_popup display=”inline” style_id=”8890″ step_id = “1”][/cp_popup]
Why have FBA items returned to you?
There are several different reasons why you would want to submit a removal order for inventory that is currently located in an FBA warehouse.
The most common reasons for submitting an FBA removal order are:
- Avoiding long term storage (LTS) fees on products that have been in stock for 12+ months.
- Removing stranded inventory that can’t be resolved or you aren’t able to get back to “active” status.
- Removing items that have had poor reviews or high returns (signaling something may be wrong with the items)
How much does an FBA removal order cost? What are the fees for the return and disposal of FBA inventory?
Removal orders cost $0.50 per item for standard size items and $0.60 per item for oversize items. This is a flat fee to return items to the location of your choice.
If you don’t want the inventory back, you also have the option of having it disposed for you. This costs $0.15 per item for standard size items and $0.30 per item for oversize items.
How to Create an FBA Removal Order
There are three options to create a removal order that we use in our business.
The first that we’ll walk through is a manual process when you have a relatively small number of items (~10 or less) that you need to remove. Each item is removed individually and this is not ideal for a large set of items.
The second option is similar to the first but allows you to remove a larger number of items much more efficiently and without having to do them one by one. I wouldn’t recommend using this option for more than 250 items.
The third option is a “bulk removal option” that is best if you have 250 or more units that you need to remove, and there are more than 50 unique items making up the 250+. This option is best suited for removals to avoid long term storage fees as this can involve removing many different products.
We’ll walk through how to do all three below, and then you can use the process that fits the number of items you are looking to remove. Let’s get into the processes!
Creating a Quick Removal Order (Good for 10 or less items)
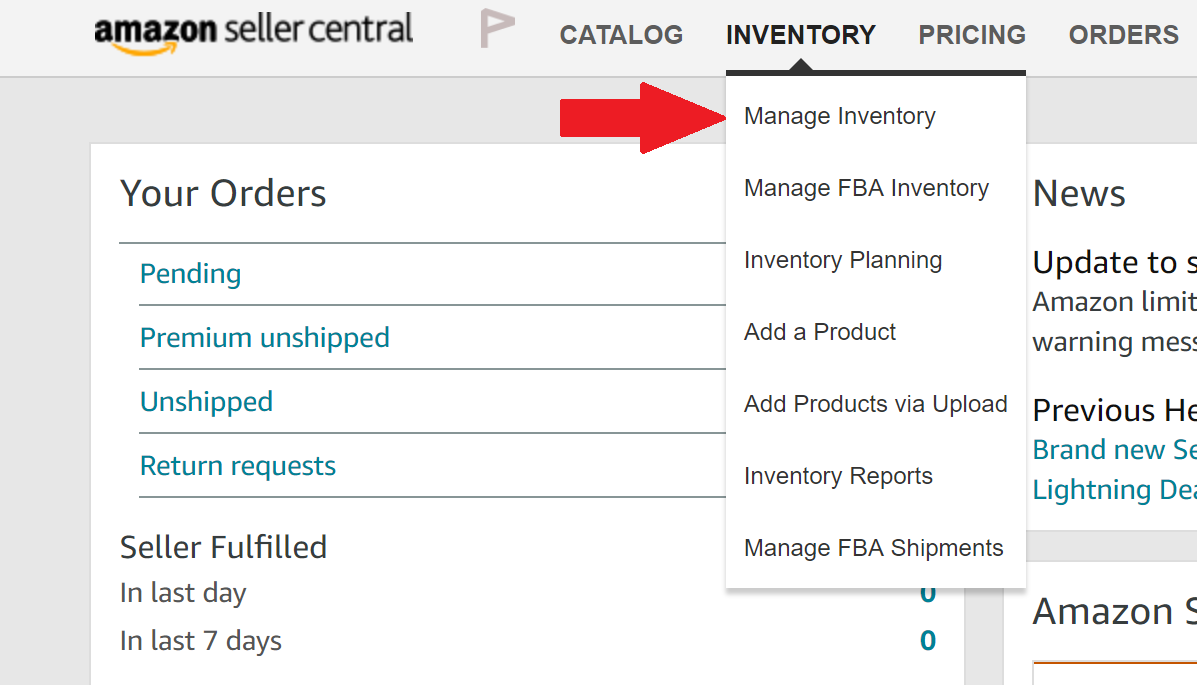
Click on “Inventory” when logged into seller central and navigate to “Manage Inventory”.
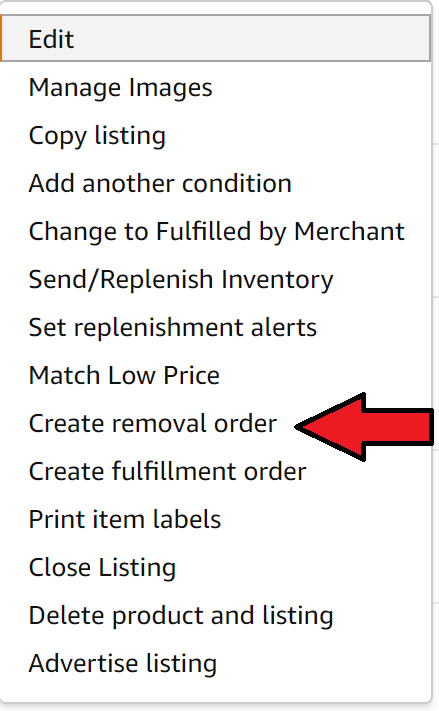
Then search for your item to remove. You can search by UPC, SKU, or title. After you do the search, locate the item and select the “Edit” button to open a drop-down menu as shown in the screenshot below.

From here select, “Create removal order”

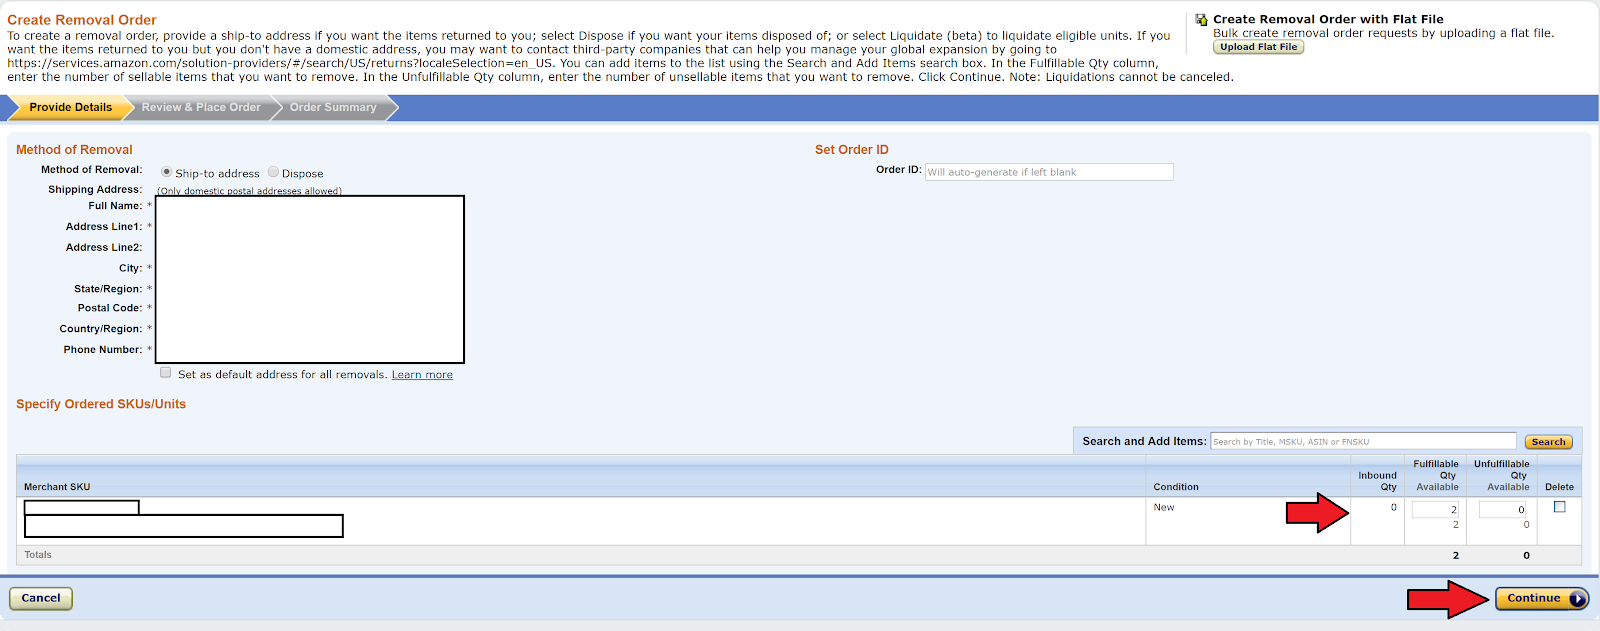
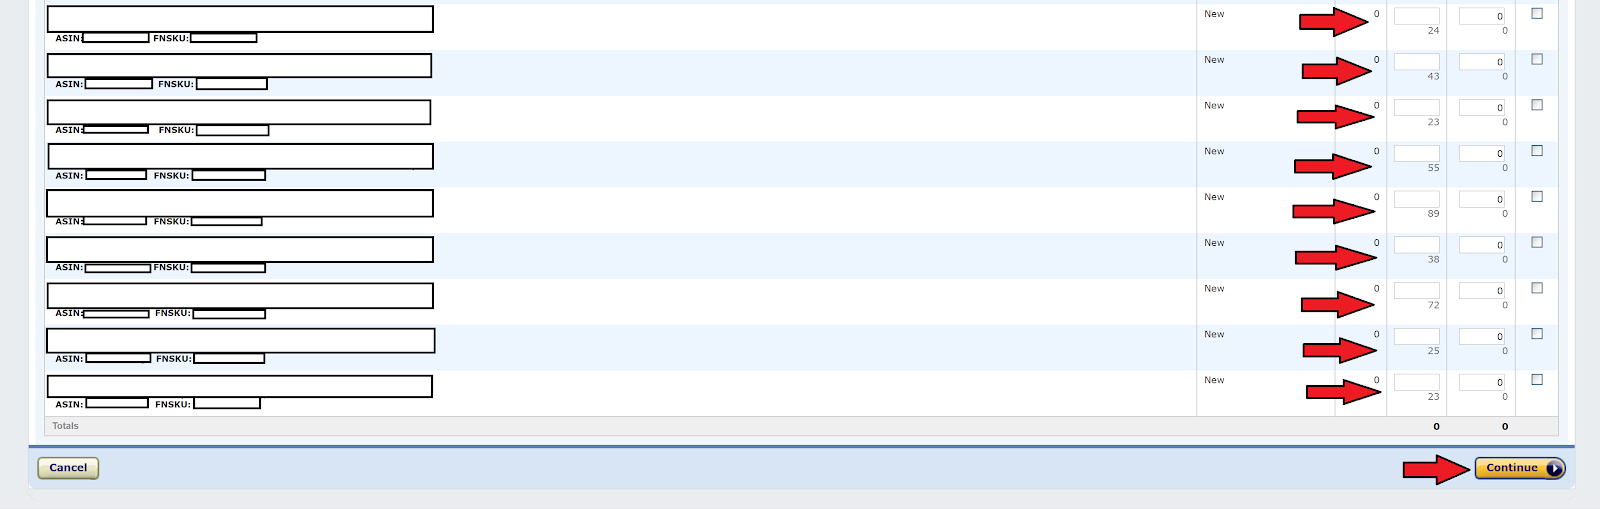
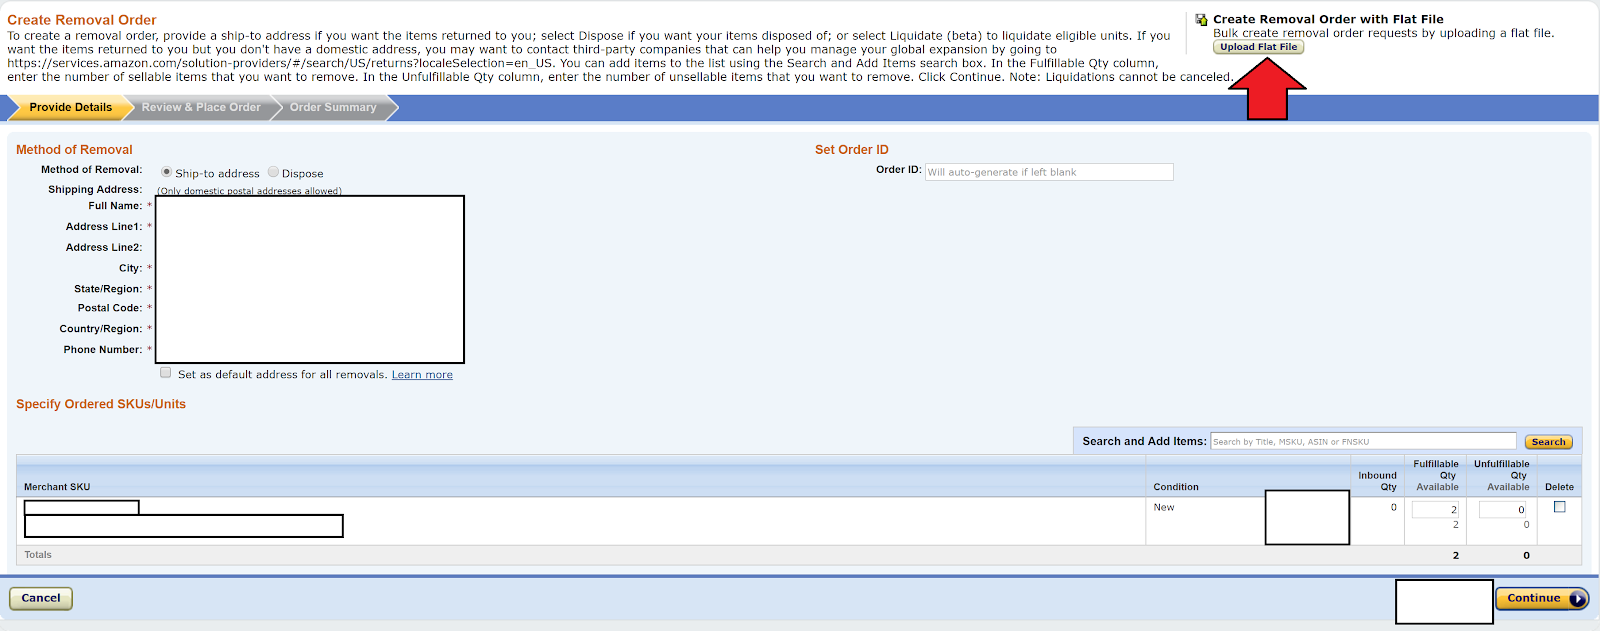
This will take you to the removal screen as shown below. Make sure to enter in the correct quantities for fulfillable and unfulfillable (if any) and proceed by selecting “Continue”.
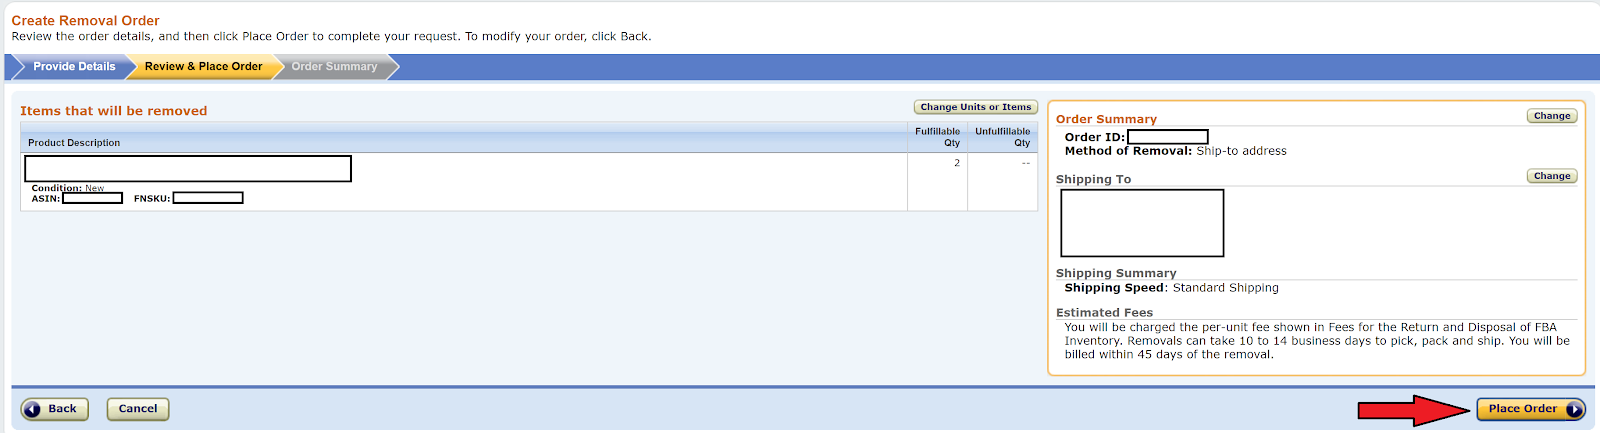
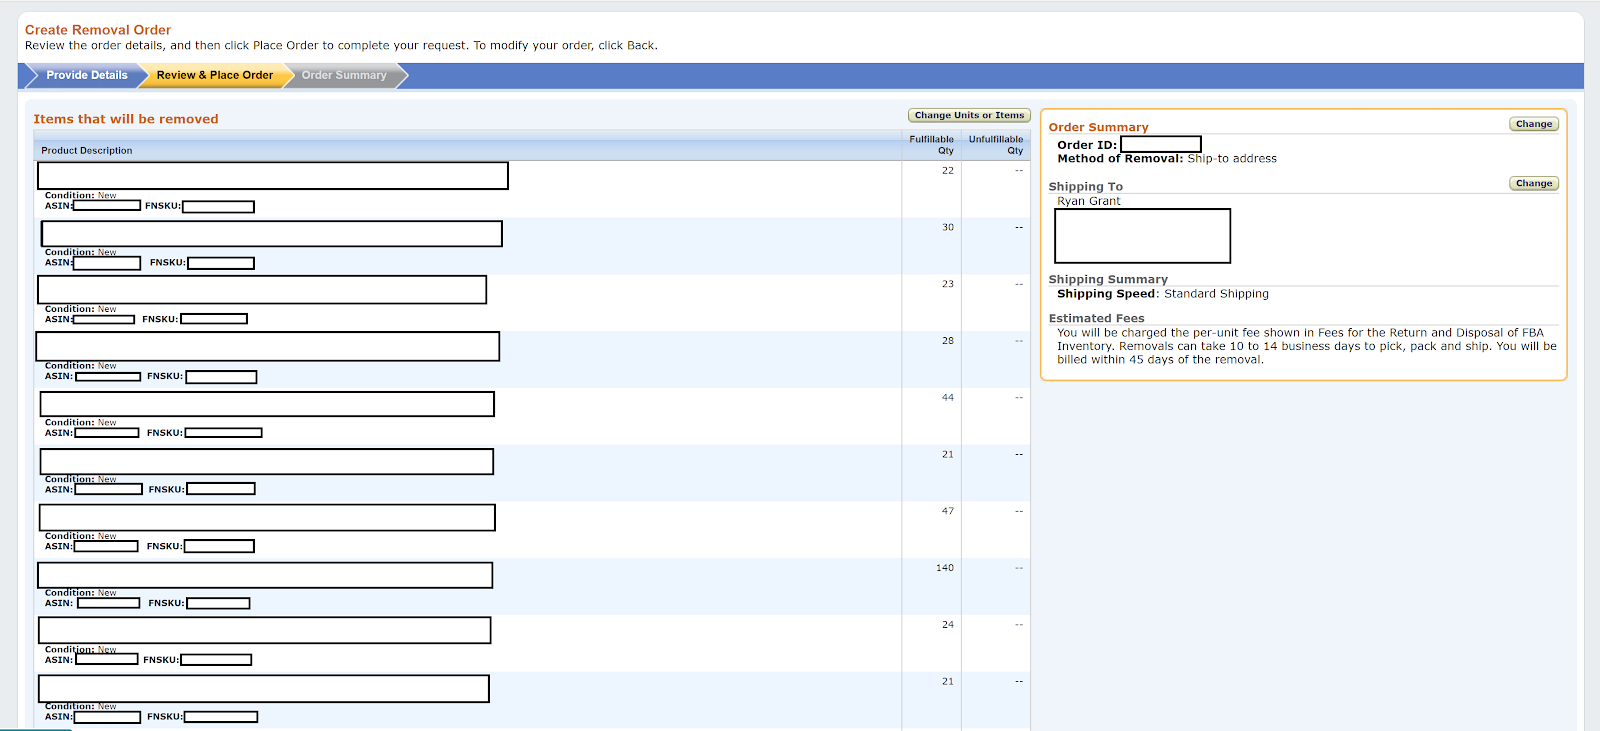
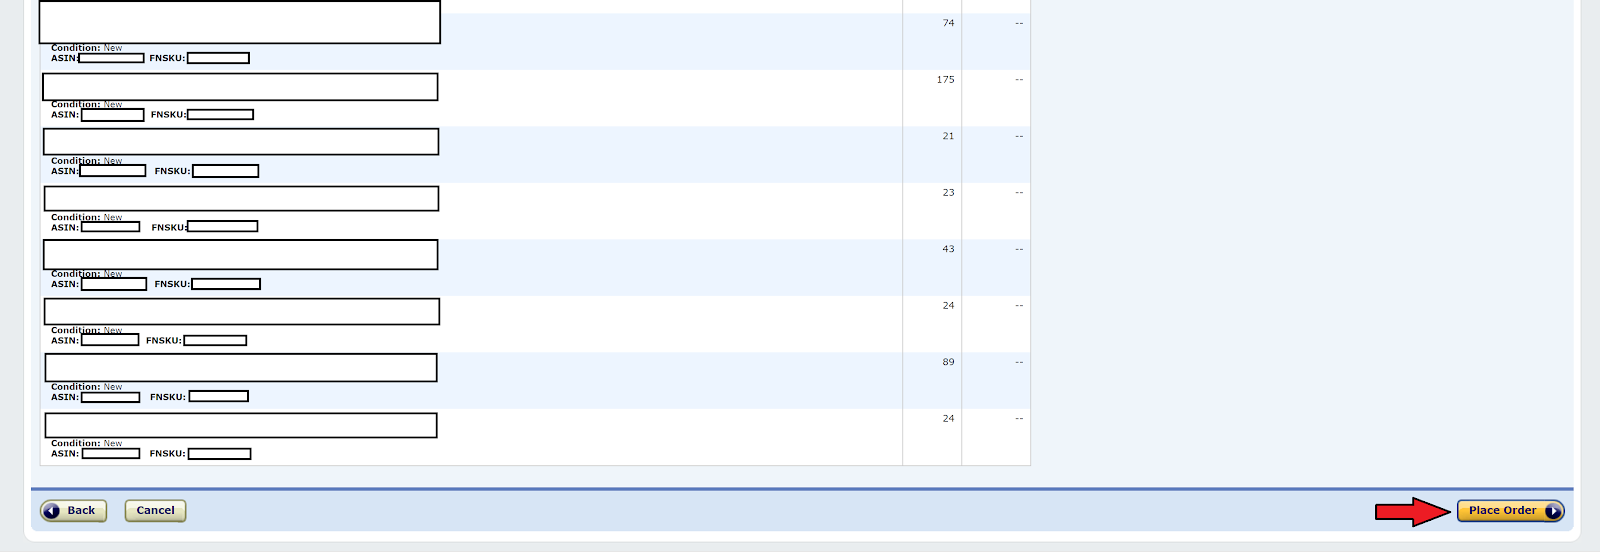
The last step is to confirm the selection. Make sure to double-check the “Method of Removal” and make sure that it says “Ship-to address” and not “Dispose” (unless you mean to destroy the items). Then select the “Place order” button.
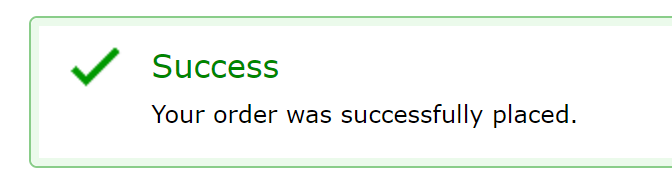
That’s it! You’re all set and Amazon will start to ship the items from your removal order back to you.
Creating a Medium-Sized Removal Order (Good for up to 250 items)
The second removal option shares a very similar walkthrough to option one but this allows you to more easily remove a larger set of items, up to a maximum of 250. Let’s dive in:
Click on “Inventory” when logged into seller central and navigate to “Manage Inventory”.
Then search for your item(s) to remove. You can search by UPC, SKU, or title. After you do the search, locate the items and check the box on the left-hand side of the screen next to the items you wish to remove. You can see an example in the screenshot below.
Then search for your next item, and check the box next to the item. You can search for additional items, and the box next to the prior items will stay checked as well. You will not lose the items that have been selected when going from page to page. You will be limited, however, to the first 250 items you have selected as a max in the next step. So make sure you don’t select more than 250 items or you will get an error message and have more work to do.
Once all your items have been selected choose the button in the top left corner in the screenshot below that says, “Action on 250 selected” in the screenshot below. Note this is just an example, and when you are doing this the button should say the number of items you have selected.

Note: The orange arrow above allows you to select all items on a single page instead of checking them all individually as the red arrows display. This feature is useful if you need to create a removal order for all items of a specific brand, or many products with the same word in the title.
Now select the option, “Create removal order” as shown below:

Here’s the default message that asks to confirm if you wish to remove multiple items. This will display every time you use this method (option 2). Choose, “Yes, continue” to move to the final steps.

This will take you to the removal screen as shown below. Make sure to enter in the correct quantities for fulfillable and unfulfillable (if any) for all items that you selected for removal:

Continue to scroll through all the items you selected and then click, “Continue” when all the quantities have been entered and double checked:
The last step is to confirm the selection. Make sure to double-check the “Method of Removal” and make sure that it says “Ship-to address” and not “Dispose” (unless you mean to destroy the items). See below:
Continue to scroll through all the items you selected and then click, “Place Order” when all the quantities have been verified as shown below:
That’s it! You’re all set and Amazon will start to ship the items from your removal order back to you.
Creating a Bulk Removal Order (Good for 250+ items or when you have a spreadsheet)
*This method can affect a large number of items — Please make sure to check the file before uploading it for any issues or errors. This is also a way to dispose of items in bulk, so make sure you have RETURN included in the appropriate field in the file to make sure there aren’t any mistakes. To walk through this process we start by going through the same first couple steps as we did in the quick method above (Option 1: 10 items or less) above:
First, find one of the items that you wish to remove from your inventory as shown below and click on the button next to “Edit”:

Then click on the “Create removal order” option:
Once you get to the removal screen as we walked through in the quick removal process above, instead of entering in the removal quantities and processing the removal for this one item, we will want to click on the button that says, “Upload Flat File” as the red arrow displays.
Note: This process is also referred to as uploading a “Flat File” if you hear anyone else mention this process in the FBA community.
Once we get to the next page, we will want to download the template as shown.

Once you download the template, an excel spreadsheet should open for you with instructions and examples on how to create this bulk removal file. I have included a couple of screenshots below showing some of these sheets that are included in the download template. Read through these in the file you download to ensure you are reading the most up to date instructions. The first one below is the overview instructions:
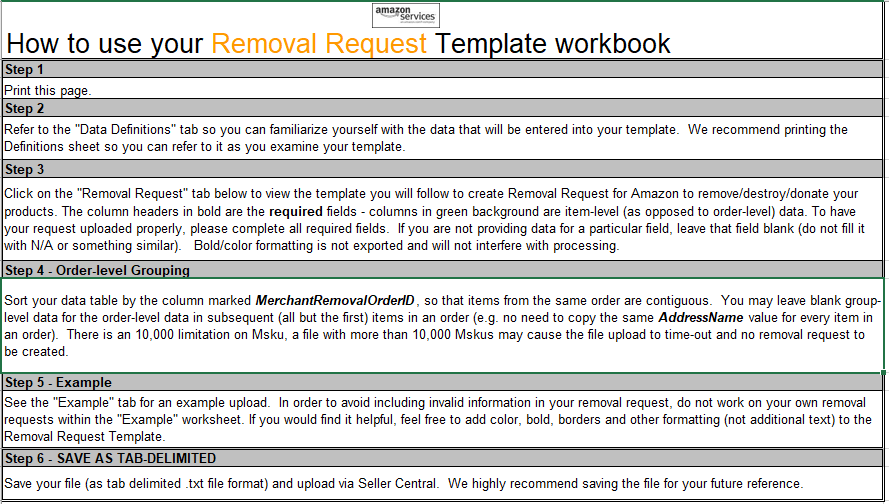
This is a continuation of the instructions that explains what the proper inputs are for entering in the fields you need to have a successful upload of the “Flat File.” Again, this info will be included in the excel template that you have downloaded earlier in this method.

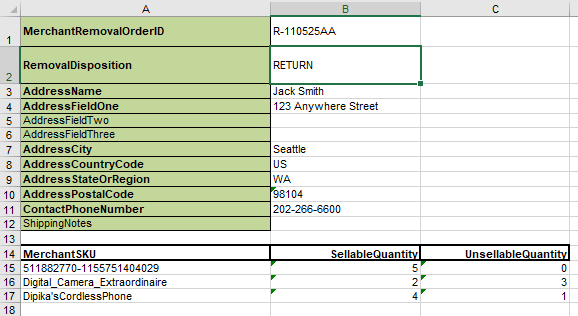
Here’s the final instruction page I wanted to show to make sure you use this as you create your own “Flat File”. This is a very helpful page because this is a direct example for how your file should look before uploading the document back into seller central. This is the most helpful page in the template that you have downloaded and should be the format you follow.
To begin the process:
- Open the file downloaded in the step above
- Create a removal tab as displayed directly above
- Fill out removal tab with the proper information
- Select “Save As”
- Name the file so you can easily identify it
- Save the file as a .txt file as shown below. Note: .txt files can only have one tab so make sure to remove the other tabs or copy the example sheet they gave you to a new Excel workbook to fill out with your information.

Open the text file you saved, and make sure it saved properly with all information being accurate. Once you verify everything is accurate, it’s time to upload this file in seller central as shown in the next screenshot. This is the same screen where you initially downloaded the template file.
Again please read this warning before uploading: *This method can affect a large number of items — Please make sure to check the file before uploading it for any issues or errors. This is also a way to dispose of items in bulk, so make sure you have RETURN included in the appropriate field in the file to make sure there aren’t any mistakes.
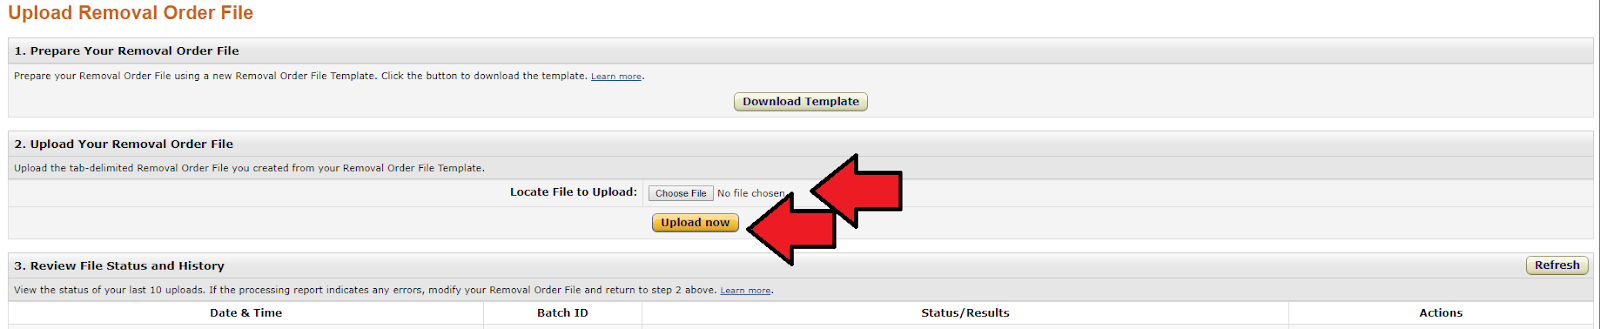
After you have uploaded the file, it will start to process the information. To know that it has been uploaded successfully, you will want to see similar results to the file status as shown below. This means that all the items (143) were completed and there weren’t any errors found. If you do have errors, you’ll want to view the processing report under “Actions” which you can also see below and it should tell you what the issues were when attempting to create the removal order.

That does it for bulk removal orders!
One last tip I want to share is that to make sure the file has processed correctly, you can check in your orders report. Go to Orders > Manage Orders within seller central, and you should be able to review the removal order. You can do this check when using any of the 3 methods shared in this post. I highly recommend using this on all removal orders you create to verify they process correctly.
Next Steps
If you have any questions about removal orders that weren’t addressed in this post, please comment below and we will do our best to answer them.
[cp_popup display=”inline” style_id=”8890″ step_id = “1”][/cp_popup]
Hi!
Do you know how the products will be packed? I have many units of the same item that I want to be removed, so I hope Amazon will consolidate them into one large box.
Thank you!
Hi Chloe,
Amazon will determine the packing for the items. Generally they’ll come back in multiple different boxes, but occasionally Amazon will consolidate them. So unfortunately the answer is that it can be different each time.
Best Regards,
Ryan
Hi Ryan, thank you for this precious information to share with us.
Do you know any recommended 3PL warehouses that located pennsylvania with little quantity and good price?
Thanks
Hi Grace,
Thanks for your email. I don’t offhand, but this directory of ours might help: Amazon FBA Prep Center Directory
Best Regards,
Ryan
You are a lifesaver. Thank you for taking the time to create this article.
Hi, great information thanks. Can you please confirm that the shipping cost to anywhere in the USA is included in the Amazon Removal Order per item fee?
Hi Linda,
Yes that’s my understanding that it’s the same fee shipped anywhere in the US.
Best Regards,
Ryan
Once the removal order is processed, do we have to arrange freight to pick up the inventory? What are the next steps? And what are the fees?
Hi Jane,
When you create a removal order then Amazon will arrange the shipping back to you. So essentially all you have to do is wait for the items to be sent back after the removal order is created. In terms of fees, it is now based on the size of the item. If you search “removal order fees” in seller central you should find the chart with information.
Best Regards,
Ryan
This was helpful, thanks. One quick tip for those using Excel to create a flat file upload. If you have merchant SKUs with spaces in (something I did until I knew better) Excel will put quotation marks around the SKU when you save it as a tab delimited txt file.
Amazon will then reject these rows on your upload. The way to fix this is to edit the txt file in a text editor like Notepad and remove the quotation marks. Upload again and all should be fixed.
Thanks for sharing this tip John!