Once you have picked a niche for your business, the next step is to build yourself a website.
This post is going to show you everything you need to do to get a website up and running for just $35 for an entire year. This is something that you can do on your own, and you won’t need to spend thousands to do so.
Most people make this step much harder than it needs to be.
One of the main problems is that there are just too many options. Deciding what to do is overwhelming.
My main goal in this guide is to make building your website simple by showing you one way that works. There are other options out there, but this way works well and is easy.
With a few simple steps, you can have a nice website up and fully functional today.
To build a niche website for affiliate marketing, there are just 7 steps you need to take:
- Choose a name.
- Choose where you will host your site.
- Register your domain name and purchase hosting. (As little as $35 combined for the first year).
- Install Wordpress. (Free)
- Choose a theme and install. (Free to $60)
- Install plugins.
- Customize the design to your liking.
Let’s go over each of these in more detail.
1. Choose a name.

We talked about picking a name at the end of the chapter on choosing a niche for affiliate marketing. If you don’t have a niche yet, you need to go read that guide and pick one before continuing.
There were three main points that I shared regarding name selection:
- Shorter is better.
- If you may want to expand your focus in the future, don’t pick a name that wouldn’t make sense if you did.
- Don’t make it clever or cutesy.
You should avoid trying to be clever or cutesy because it is hard to find something that everyone will like. Things that I find amusing can seem very dumb to someone else, so you risk turning people off before they even get to know your brand.
On the other hand, you want to avoid being too narrow to the point your site name doesn’t make sense if you expand the content you write about.
Finding exact-match domain names used to be the number one goal of niche website builders due to SEO benefits, but study after study has shown that using one doesn’t do anything for SEO anymore. They just make your site seem boring to real people.
The campinghammockreviews.com website that I talked about in the intro guide to this series is an example of an exact-match domain.
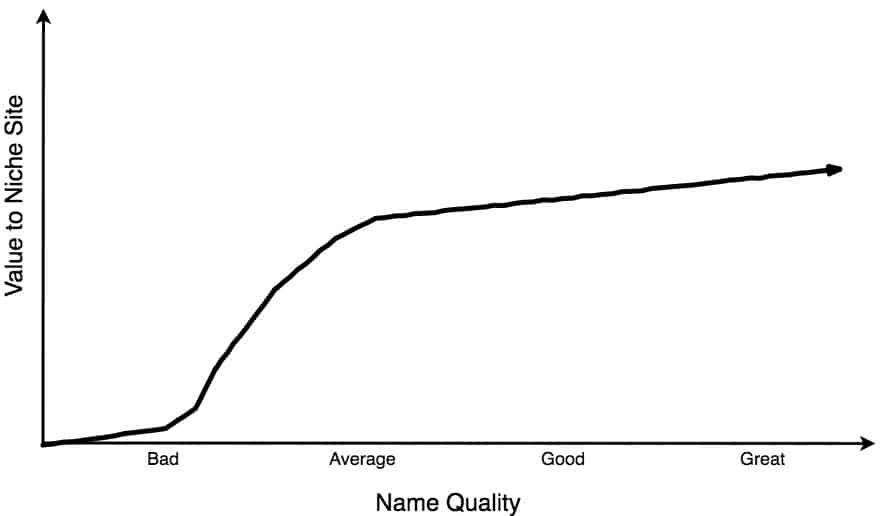
Don’t worry too much about your name though.
The extra value you get from a better name drops off very quickly once you have successfully avoided a bad one.
The brainstorming process I recommend for name selection is also very simple.
- Make a list of potential names.
- See which names (or something similar) are available as a .com domain.
- Come up with a final list and ask people you know which ones they like and why.
I recommend sticking with .com domains simply because people trust them more.
To check the availability of a name, use namecheckr.com. It will instantly tell you the availability for domain names, facebook pages, twitter handles, and pretty much every other social account imaginable.
Finally, run the list by someone you know to get a second opinion.
If you don’t like the approach I outline and are committed to finding the perfect name, then I recommend the book Hello My Name Is Awesome.
2. Choose where you will host your site.
An important part of building your website is getting it connected to the internet, and that’s where web hosting comes in.
There are a lot of options out there, and you should judge them on four criteria:
- Reliability
- Speed
- Customer service
- Cost
Two hosting providers that I have used and recommend when you are just starting are iPage and Siteground.
iPage is the lowest price out there that I can find, and it’s the hosting that I used when I started this site. So for the lowest price option that will get the job done, I’d go with iPage.
Siteground is a little bit more expensive, but they are now who I am using for hosting all of my other smaller project websites. The main reason is that they have some of the best support and reliability of hosting at a similar price point.
If and when you start to get some serious traffic, I highly recommend upgrading to WPEngine.
I use WPEngine for this website now. Their customer service has blown me away time and time again.
Every time I’ve ever had a problem with the website – even things that are completely unrelated to hosting, they have helped me fix it, and they fix things fast.
Their support representatives are available at a moments notice, and they are extremely skilled with all things related to WordPress and setting up websites.
The hosting itself is also extremely fast, reliable, and easy to use – plus you get built-in bonuses like CDNs and testing environments.
You pay more for this level of service though. The cheapest plan they currently offer is usually about $35 per month. If you use this link and pay by the year, you can get that cost down to about $23 a month though.
If you are starting on a tight budget, I recommend going with one of the cheaper options mentioned above to start and then upgrading to WPEngine once you are making enough money from the site.
3. Register your domain name and purchase hosting.
You should choose your hosting provider before registering your domain because some places offer deals where you get a free domain when you purchase hosting.
WPEngine doesn’t offer domain registration, so if you are taking either of the options I recommended, iPage is where you will be registering your domain.
Domain registration is right around $10-11 no matter where you register, although iPage offers a free domain name when you also purchase hosting.
If you are ready to get your name, simply head over to iPage and buy it. If you get your hosting while you are there, it will cost about $2.99 a month for a year or you can purchase three years up front for $1.99 a month.
4. Install Wordpress.
Once you have purchased hosting, your provider will give you instructions on how to setup your site.
Your host may install wordpress for you if you are purchasing WordPress hosting, or you may have to do this through “cpanel” of the web host you choose.
The details on how to access cpanel will be emailed to you. Once you are there, you just click the wordpress installer button, choose your installation settings and login details, and click install.
You’ll now be able to go to yoursitename.com/wp-admin and log in to your site.
These instructions were specifically for iPage, but the process is very similar no matter what host you choose.
5. Choose a theme.
Themes are the ‘skin’ of WordPress. There are thousands of options, and each one will make your website look and behave a little differently.
This is yet another step where it is easy to spend too much time agonizing over your options.
All you really need is a lightweight theme with good support.
My favorite is Astra.
There is both a free and a paid version available. The free is plenty to get started, although the paid version offers a lot of great features and is definitely worth buying. The paid version is what I am using on this site now.
To install the free version (which you have to do even if you get Pro), go to your WordPress dashboard, click appearance, and then click themes.
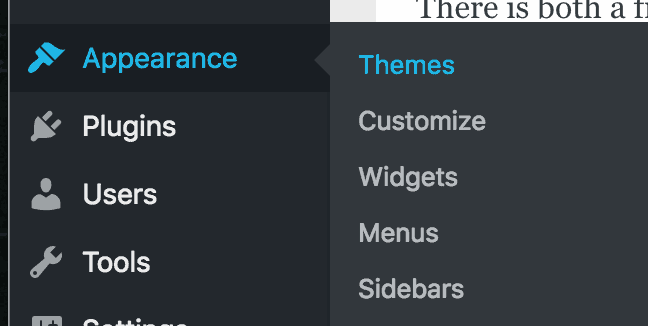
From there click “add new” at the top of the page.
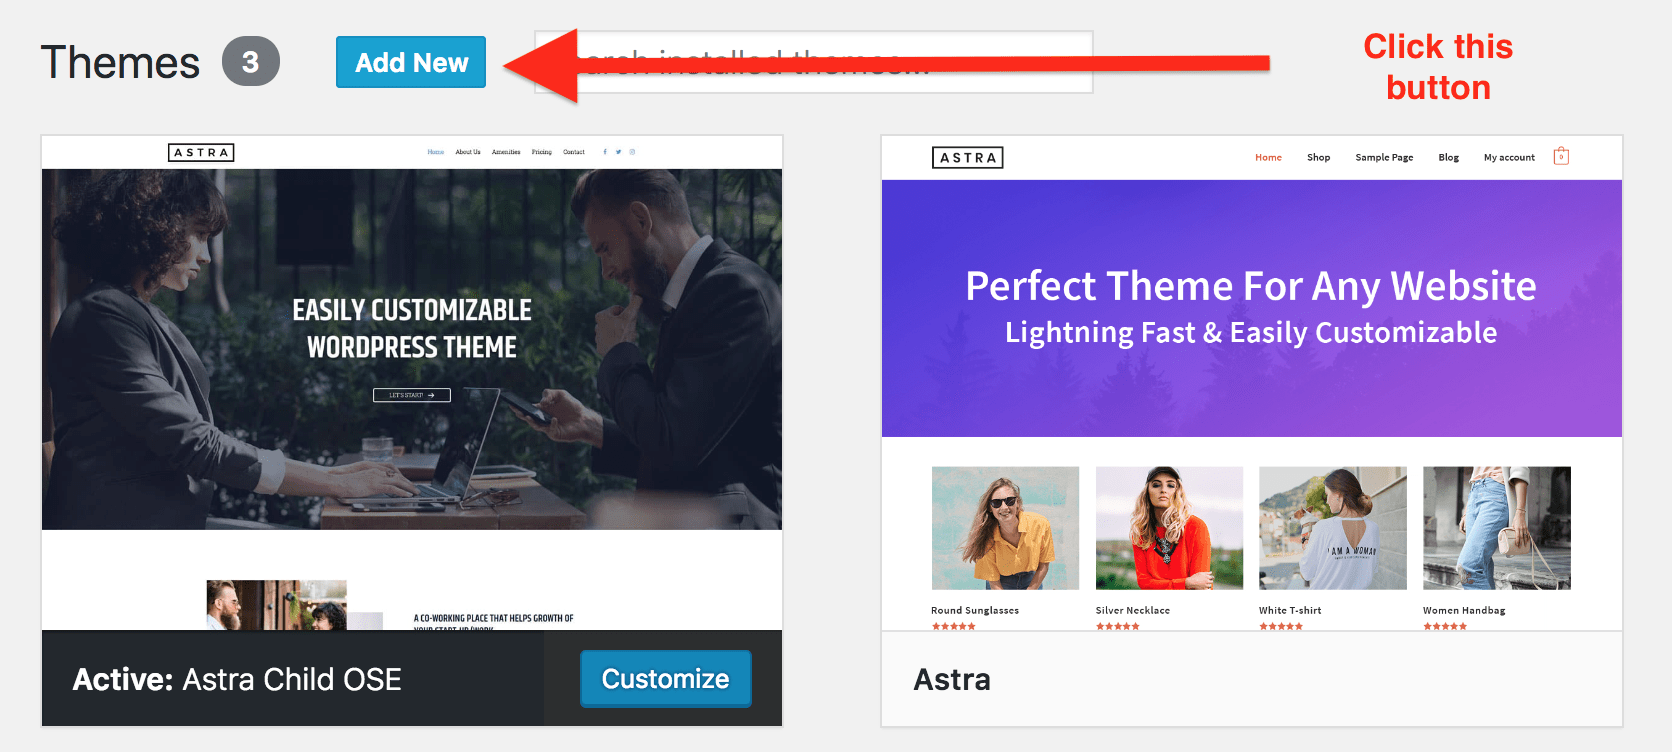
Then search for Astra with the search bar. You can also find it under the ‘Popular’ tab.
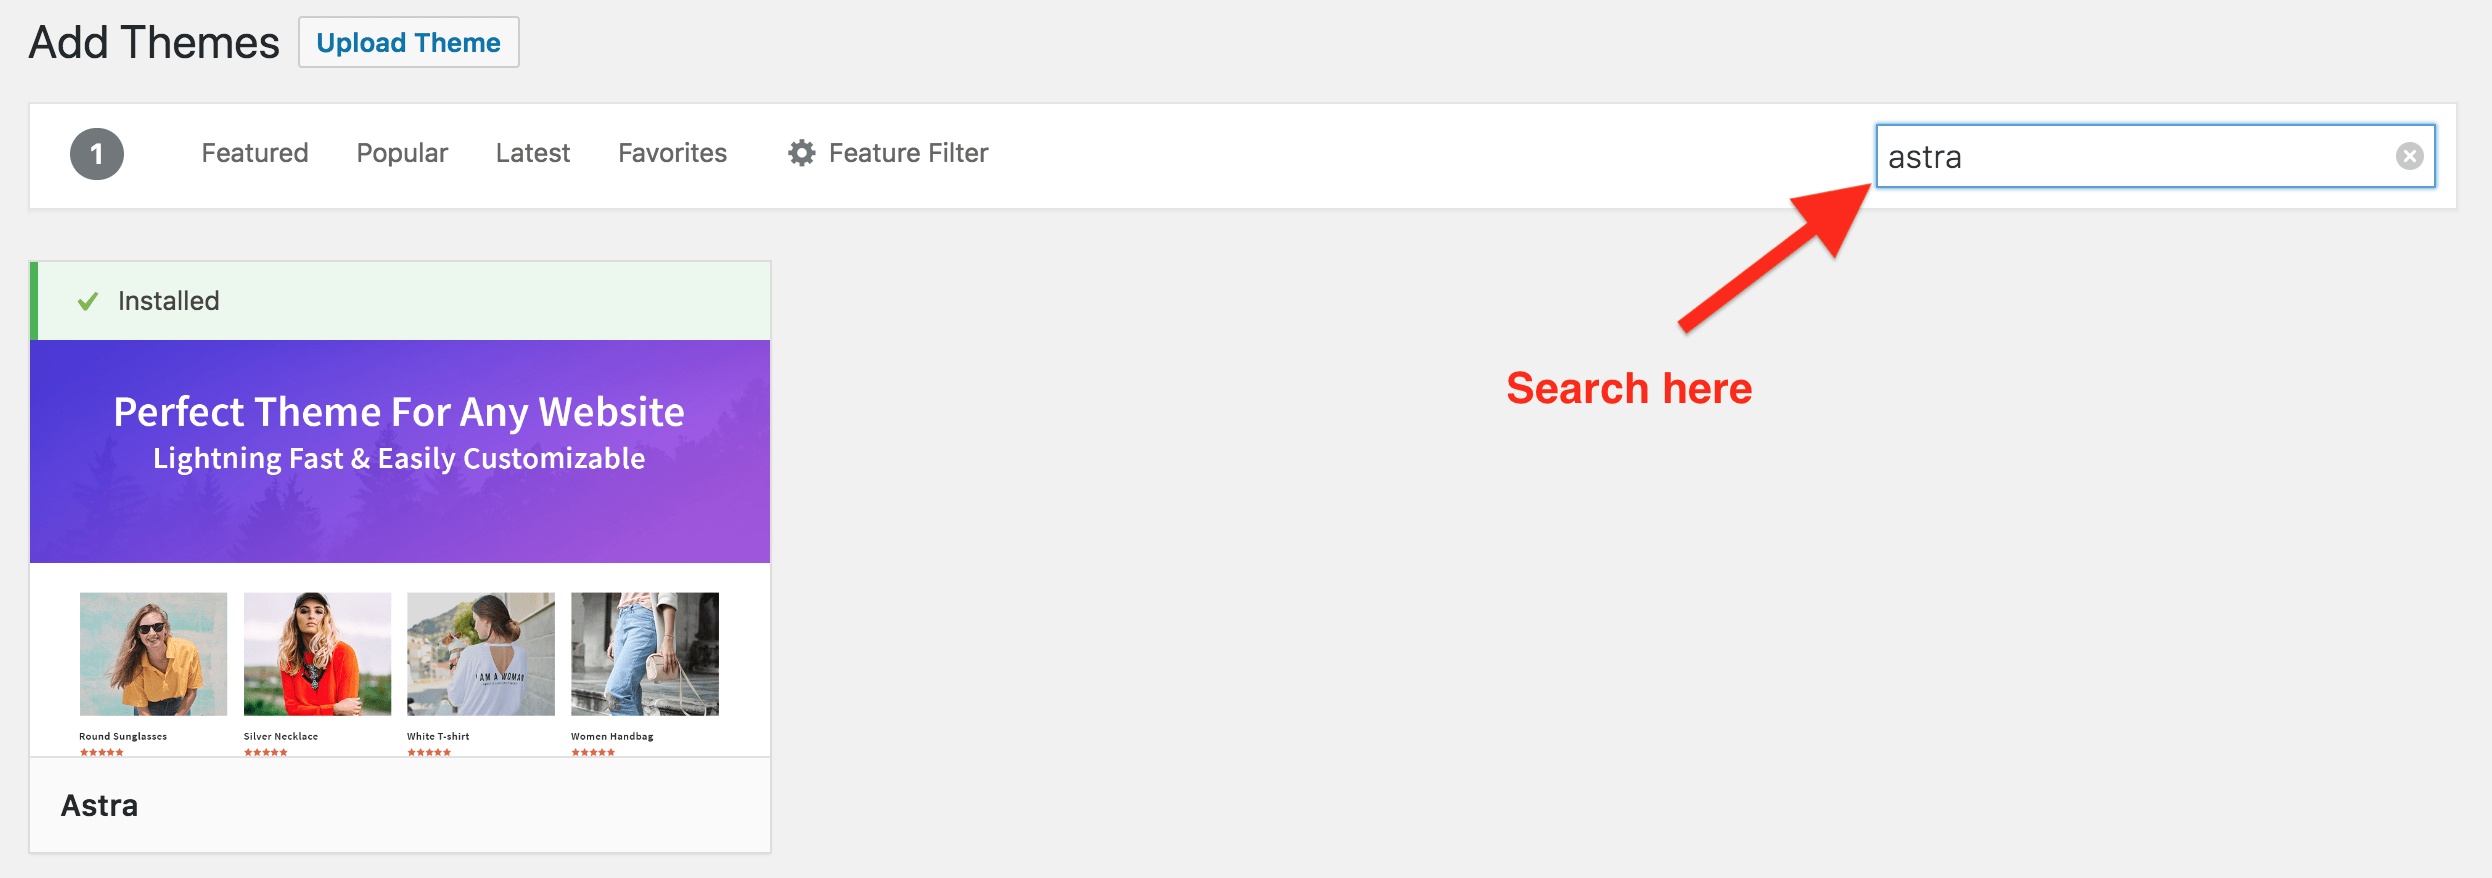
Click on install and you are pretty much ready to go.
The last thing you may want to do is install an Astra child theme. These allow you make changes to the theme with less risk. To generate the child theme file you need to upload, go here.
Once you have created your child theme file, go to the same Add New Theme page as above, but click the upload theme button instead. You’ll need the regular version of the theme installed first.
You will have to follow a similar process for any theme you choose, but if you don’t have a very good reason for choosing something else, I recommend just sticking with Astra and not slowing down to research other options.
Astra has worked incredibly well for me, and it is designed to work with page builders – something we will talk about next.
Like I mentioned above, I believe that Astra Pro is more than worth it if you have the money. It makes achieving the look you want for your site incredibly easy, and it also makes it very simple to do things like installing Google Tag Manager.
It costs $59 for a year and is installed as a plugin, which we will go over now.
6. Install plugins.
Once you install your theme, you are almost ready to go. You can now publish content to your site and make changes to the way it looks via Appearance > Customize.
Plugins are how you add extra functionality to your site. Many of them are free.
Most people get too carried away with adding plugins though. The more you add, the more you risk slowing down your site or causing conflicts between plugins.
Here are the main plugins I use:
- Akismet Anti-Spam
- Astra Pro
- Elementor Pro
- Jetpack
- Shortpixel Image Optimizer
- Yoast SEO
There are a couple others I use to connect my site to other services, but for the most part that is it.
Akismet, Jetpack, and Yoast are all extremely popular and fairly standard plugins that make sure your site runs well.
I mainly use Yoast to make sure my sitemap is submitted to Google for SEO purposes, not to worry about the content grades it gives.
That leaves just three others: Astra Pro, Elementor, and Shortpixel.
As I said above, the Pro features of the Astra theme are lightweight (don’t slow anything down and easy to use) but add a ton of functionality to the site. You don’t need them to start, but they are a great value if you have the money.
Elementor is a page builder and one of my favorite tools.
It allows you to build custom web pages without any coding or design experience thanks to a drag and drop editor. Every page on this site other than blog posts was built using Elementor.
I could write an entire post just on how great Elementor is, but the general idea is it gives you full control over how your website looks, even if you don’t know anything about coding. The recently released ‘theme builder‘ options, which allow you to easily create every aspect of your site, including headers, footers, and archive pages.
There is a free version to get started with, but like Astra Pro, there is a ton of additional value in the Pro version. It only costs $49 for one site and is worth every penny.
The final plugin I mentioned is Shortpixel. This is an image optimizer which automatically compresses any image I upload to my site without creating any loss in image quality.
Since installing it, I have seen major speed improvements.
There are other page builders and image optimizers out there (I’ve tried many of them), these are just the ones that I use and recommend.
One thing that you will notice is missing is a plugin for Google Analytics. I have this installed via Google tag manager using the ‘hooks’ feature of Astra Pro. You may want to use one of the free Analytics plugins. I like Analytify.
The free version of all of these plugins can be found by going to Plugins > Add New from your WordPress dashboard and then searching.
7. Customize the design to your liking.
Once you have all this setup, the only thing left is to finish customizing the appearance of your website.
This includes things like:
- Picking a color scheme
- Setting a default font
- Uploading a logo
- Changing how the header and menu display
- Changing the default width of blog posts
- Creating a home page
If you are new to all of this, I recommend starting with the customize menu in WordPress and going through each option to see what it does and playing around with the settings.
This will take 30 minutes at the most and you will learn 10x what you can watching videos on how to do the same thing.
For your logo, I recommend going to Fiverr and searching for ‘logo design’. This is the cheapest way to get a nice logo that will work when just starting out.
If you don’t want to spend money, use a site like https://logomakr.com/.
Now go do it.
Like I said at the beginning of the post, there are hundreds of other ways and paths you could take to building your website.
I didn’t go into every single option because it’s not useful to you. I’d just be creating more things for you to think about and slowing you down.
This is the exact process I have used, and I know that it works.
If you don’t waste time exploring alternative options, you could go get all this set up within an hour or two.
On the cheap end, you could be up and running for about $35 for an entire year (domain registration plus hosting). If you add in the Pro versions of my recommended theme and page builder, you are still at just $144.
If you upgrade even further and get the best hosting partner on the market, you are at just $424.
Add in a $25 logo and you have spent less than $450 to have an extremely easy, fully customizable website for an entire year.
You now have options for starting ranging from $35 on the cheap end to $500 for about the best website you could possibly get anywhere.
There’s no reason not to do this if you are even slightly interested in testing niche sites and affiliate marketing!
Thanks for sharing this blog and learnt how to build a website in an easiest way! Keep on posting this type of information.
No problem, glad you found it helpful!
Best Regards,
Ryan
I have a godaddy bookkeeping account for mu Amazon FBA, how do you feel about their website hosting?
Hi Krystye,
I haven’t used them personally but I did research them when initially picking who to setup my website through. From my research initially, and my experience, the options I mentioned above are what I have been happy with and what I’d recommend starting with.
Ultimately though if you think something else would get the job done and you’d rather test it out, I’d encourage you to go for it so you can get started sooner. You can always switch your web hosting company later if needed.
Best Regards,
Ryan